Keen gardeners here on the West Coast often mark Valentine’s Day, February 14th, as a day for planting garden peas. While the weather may be mild at this time of the year, the soil is still quite cold which often results in poor germination. In addition, peas started in very cold soil are more susceptible to root rot and other soil-borne diseases. However, with a little planning and a few shortcuts, even gardeners who have to wait for a thaw to plant can get a jump on their pea harvest.
The hardest decision to make is choosing a variety. If you prefer shelling peas, I would recommend Maestro, Green Arrow, or Progress #9. These varieties are relatively early and give good yields. If you have a cooler season & are willing to wait for your peas, Alderman (Tall Telephone) is amazingly sweet. For snap peas, Sugar Snap is an old-time favourite with excellent taste. However, the vines are often 6ft tall. For a shorter earlier-maturing variety, try Sugar Mel or Sugar Ann. Finally, for snow peas, I love Oregon Sugar Pod as well as Oregon Giant. Even if some of these pods get lost in the foliage and end up forming peas, I’ve found them to be quite sweet.
Although peas can survive weather down to 40 F, the seeds still require warmth to germinate. Cold, damp soil will retard germination, making the seeds susceptible to fungus & insect damage. An easy trick is to start the germination indoors. Pea seeds are easily sprouted between damp paper towel and once the root appears from the seed, it can be planted outside with a higher chance of survival. In colder areas where the ground is still thawing, the seeds can be grown as transplants for a couple of weeks longer.
Some sort of trellis will be required and should be erected before the plants emerge. Most peas grow to a height of 3 ft although many of the heirloom varieties can reach 6ft or more. Pea netting or even fish netting is ideal to allow the tendrils to form a good grip. If trellising just isn’t in the picture for your garden, I would recommend growing a semi-leafless pea variety like Novella II. The plants produce an abundance of tendrils and can support themselves if planted about 1 inch apart.
Ultimately, temperatures will rise and will support growth outside. Whether you’re direct seeding or transplanting, peas grown in early spring will benefit from the addition of inoculant. Peas, like other members of the legume family, have the ability to supply their own nitrogen from the atmosphere through a relationship they have with Rhizobia bacteria.
Although rhizobia are naturally occurring, in cold soil, they are not very active. Inoculant contains millions of these rhizobia bacteria and often comes in the form of a powder. Gardeners can either coat the seeds directly (like “Shake & Bake”) or mix inoculant into the soil where the transplants will grow. Either way, you will see a benefit. In trials, inoculated pea plants yielded 77% more peas than uninoculated plants. One word of caution, once the inoculant is moistened, use it all & do not let it dry out or you will kill the rhizobia.
Since peas can fix their own nitrogen, they require less nitrogen in their fertilizer. A fertilizer too rich in N (the first number) will promote leafy growth and delay flower & pod production. Before planting, compost or aged manure can be dug in. Peas also respond well to the addition of phosphorus (the middle number) so digging in bonemeal or rock phosphate will help with pea production.
Pre-sprouting, inoculating and extra phosphorus will all help your peas to get a jump on the weather and produce a bounty of harvest.
The geraniums you’ve been nursing indoors probably are getting tall and leggy due to the lack of natural light in winter. It’s a good idea to cut them back to one foot tall.
Get your seed orders in. Remember to keep your summer vacations in mind when choosing planting dates – you don’t want to be away when everything matures.
Branches of forsythia, pussy willow, spirea, and dogwood can be forced for indoor bloom. Make long, slanted cuts when collecting the branches and place the stems in a vase of water. Change the water every four days. They should bloom in about three weeks.
Hello fellow Earthlings, and welcome to the patio. In this discussion we will be touching on some fun ways to extend our gardening addictions through the winter by gardening in containers. So let’s don our cool weather gear and take a trip out to the potting shed.
Gardening in containers is a wonderful way to keep your prized plants close to living spaces and, of course, mobile in case of severe weather. During extreme cold plants in containers can be easily moved to protect them, they can be moved out of severe winds, and can even be brought indoors if weather conditions get too inhospitable. One other great thing about gardening in containers is the window garden.
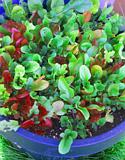
Sunny kitchen windows are some of my favorite spots for indoor window gardens. These windows are often located right above the kitchen sink and the increased humidity from this proximity to periodic running water and steam really allows us to grow a number of different types of plants. Some favorite plants for the kitchen window are certainly culinary herbs. There is nothing like having the luxury of a sprig of fresh thyme or a few fresh basil leaves when cooking. And when your family and guests compliment you on your culinary prowess, you can show them your lovely herb garden in the window. For those individuals who love colorful foliage plants, leaf lettuces make very decorative houseplants during the winter season. I have a friend that transplanted from California to Wisconsin, and really missed her orange and lime trees. Two years ago I sent her one dwarf tree of each and now she has citrus that ripens indoors. The trees are decorative and her guests really get a kick out of her indoor (sunporch) citrus grove when it is forty below outside. She takes the trees outside late in the spring after the threat of frost is past and her trees spend the summer out in the sunniest part of her patio. When the weather begins to cool and frost is eminent, she moves the trees indoors to protect them. She has now graduated to a dwarf avocado and is actually growing coffee beans in what are considered rather impossible climate conditions.
As with all types of gardening, your passion and your imagination are the only things that can limit the possibilities for gardening indoors in containers during the cool season. If space is an issue try smaller plants like herbs and some mini veggies. A pot full of carrots is a beautiful display of greenery that looks a lot like a fern. But the goodies under the ground will be sweet miniatures of the ones that grow outdoors when the weather is warmer. Romaine, Endive, and some of the designer lettuce varieties grow so fast that you can actually trim a few leaves off to make a sandwich or salad each week or every day depending on how many you grow. The idea of having fresh, nutritious food growing in the house really lowers the occurrences of cabin fever and, although it seems odd, brings more fresh oxygen into the house. These fast growing plants are amazing air fresheners as well.
I think my favorite thing about growing edible indoors in containers during cold weather is how children begin to take active interest in the process. Kids are naturally inquisitive and have a tireless hunger for knowledge. If you can provide them with clever home projects when they are stuck inside, you will see that they may take a more active role in family gardening projects when the weather warms up. Pick some veggies that they like to eat and grow them indoors, make a bit of a ceremony when harvest day comes around and let them pick the veggies. They will be more likely to eat vegetables when they are involved in cultivating them. This is also a very good way for you to teach them lessons about how nature works and the benefits of growing food without the need for potentially harmful chemical pesticides and fertilizers. They will gain some interesting insights on the environment and on plant cultivation that will make for active family sharing of ideas as well. Eating healthy food that they grew themselves is a very rewarding experience for a child. Try it and witness how they enjoy. Nurturing is a basic human attribute that can be practiced by growing plants. This is especially true for you apartment/ condominium dwellers without the room for domestic animals.
Materials for these projects are inexpensive, easy to obtain, and the choices of containers can be as simple as a clay pot or any reflection of your creativity. Potting soils, natural liquid plant foods, water, and light complete the list of needs. Container gardening is a simple winter gardening project that will reward you in many ways. Bring the garden inside this winter, you’ll be glad you did. Next time we will be discussing one of my favorite topics, compost. See you in the Garden!
Got questions? Email the Doc at Curly@mill.net Don Trotter’s natural gardening columns appear nationally in environmentally sensitive publications. For more tips check out Don’s books Natural Gardening A-Z and The Complete Natural Gardener available at your local bookstore or at all on line booksellers. Coming in March Don’s new book Rose Gardening A-Z will be out. All are from Hay House Publishing http://www.hayhouse.com/
First of all, grow, buy, borrow, or steal the biggest longest freshest daikon you can find. I was fortunate enough to find fresh ones grown locally at a Buddhist Taiwan bakery in my neighbourhood (I live in paradise for stuff like this, being on the west coast of B.C….)
This daikon was fresh as a daisy, white, easily two feet long and three inches wide, and weighed about five pounds. It looked like a small baseball bat! I used about half to make one of these recipes.
Wash the daikon, and slice in half lengthwise a little ways along the daikon at a time. Using a sharp knife, slice in thin slices. Each slice will be cut in half, like a half moon.
Put the daikon pieces in a large glass, plastic or pottery bowl (no metal). For a fairly large quantity of daikon, (who measures? not me) I used:
salt, maybe 1/4 teaspoon
sugar, closer to 2 teaspoons
pepper
rice vinegar, 1 tablespoon?
beer (a half cup, drink the rest….)
a big spoonful of miso
garlic (optional) 1 chopped clove
one or two finely chopped green onions
Mix well.
If you like, add chopped sweet red peppers and jalapenos to taste, or, the alternative:
Pick up some “Chili Sauce for Chicken” – an extremely common condiment from Thailand, available at most imported food stores which carry Thai, Japanese, Korean stuff. The sauce is sweet, not too hot, and works perfectly in this recipe. I added a couple of good size shakes of it to the recipe. Perhaps a tablespoon or so. This sauce is versatile, and cheap, considering. Here in Vancouver a large bottle is worth under three dollars Canadian. You can use it on any kind of chicken, fish, or meat to jazz it up during baking, frying, on the BBQ, or with cooked meats, in meat loaf, mixed with cream cheese as a spread. The possibilities are endless. Try it with fresh ginger, garlic and soy sauce, as a basting sauce or marinade for chicken or pork on the BBQ.
Back to the recipe:
Mix everything lightly. It works to cover the bowl with something like a plate, as it starts to ferment within an hour or so at room temperature. After two hours or so you can eat it. It is crispy but tender and soft and tangy and funky, all at the same time. It’s the kind of thing I can’t stop eating, and that’s a good thing, because it happens to be full of trace minerals, and has practically zero calories.
By the next day, if you can leave it alone that long, it gets better and better. After about twenty four hours, you should keep it in the fridge or outside. By then, it has turned into real home-made “Kim Chi”, the hallmark of Korean cuisine. Every Korean person has his or her own particular version, usually made with the basic ingredients of chinese cabbage (sui choy), daikon (lo bok), onions, etc. and buried in the ground in big pots.
You can use other things in these pickles: Anything goes. Last year I tried a similar thing with Komatsuna (japanese spinach mustard) – but you can use any green, chinese cabbage, whatever.
Sharon Hanna is a garden writer and avid cook based in Vancouver, BC. Read her latest articles on Starting Seed, Praying Mantis and more at: Themestream