

|
Organic Website Website
|
|
 |
Regular price – $15
CDN, Sale price – $9.95
Homemade
Fungus Gnats and Damping-off Control
by Arzeena
Hamir
Late winter and early spring is a great time to start
seedlings and get the gardening season underway. Growing
your own seedlings from seed is highly rewarding and can
open doors to even more species that are not often found
in garden centers. However, a couple of problems can sometimes
curb the indoor green thumb and seriously affect the success
of growing seedlings. Fungus gnats and damping-off are
two afflictions that commonly affect gardeners. However,
before you spend money on expensive chemicals, the solution
to these problems may actually be much more low cost that
you suspect.
Fungus gnats
These tiny, black insects seem innocuous enough as they
buzz over your plants. While the adults rarely cause
any problems to plants, if the young larvae are in large
numbers, they can damage your seedlings. Fungus gnats
search out moist soil in which to lay their eggs. When
the eggs hatch, the larvae will feed on the roots of
your plants. Healthy seedlings will often be able to
withstand this feeding but any seedlings that have small
root systems like onions and leeks and those that are
showing symptoms of nutrient stress can be put back
quite significantly.
The easiest way to prevent
fungus gnats is to water your plants properly. Overwatering,
which causes your potting mix to remain moist for extended
periods of time, seems to attract fungus gnats. If your
plants are already infected, allow the soil to dry out
between watering. Alternatively, sprinkle a ¼” of sand
on top of your soil to confuse the adults. Since the
sand drains water quickly, it can sometimes trick the
adults into thinking the soil is dry.
Potting mixes containing
peat seem to be particularly affected by fungus gnats.
If the problem is reoccurring for you, think about switching
from a peat-based mix to one that only contains perlite
and vermiculite. Lastly, if the adult fungus gnats are
bothersome, trap them by making your own sticky trap.
The adults are attracted to the color yellow. Make your
own sticky trap by smearing Vaseline or Tanglefoot on
a yellow surface and hang it up close to where the adults
congregate.
Damping-off
Not only will controlling
your watering help to prevent fungus gnats, it will
prevent the second most common problem, damping-off.
This condition is caused by several fungi such as Phtophtora
and Pythium. These fungi live at the soil line, just
where air meets the moist soil surface. When your potting
soil is kept continuously moist by overwatering, the
fungi attack your seedlings. The telltale symptom is
a constricted stem, just at or below the soil surface.
Once seedlings are infected, they tend to fall over
at the soil line.
As mentioned, allowing
the soil surface to dry out will go a long way in preventing
this problem. If, for some reason, your potting mix
remains wet for an extended period of time, look to
your kitchen cabinet to help prevent the disease. Cinnamon
powder is a natural fungicide and has been shown to
be particularly effective against damping-off. In addition,
Weak chamomile tea (after it has cooled) is another
natural fungicide.
Ensuring seedling success
need not be complicated or expensive. Controlling your
watering and a few home made remedies will go a long
way to guaranteeing healthy seedlings.

is an agronomist and freelance gardenwriter. When
she’s not working on her garden, she runs Terra Viva
Organics.
Training
Beautiful Flowering Shrubs into Unique Ornamental Trees
by Michael
J. McGroarty
There is nothing more beautiful than a flowering shrub
in full bloom, except maybe a flowering shrub in full
bloom that has been trained to grow as a single stem tree.
Imagine having a fragrant Viburnum Tree next to your patio
or outside your bedroom window, waking up to such a wonderful
aroma.
Don’t confuse what I am
about to explain here with the common technique of grafting
flowering shrubs on to the tall stem of some sort of
rootstock. Grafting is very effective, but not so easy
to do. This is much easier. Not only that, when you
train the shrub to grow into a single stem tree, you
can end up with some very interesting plants.
Training a flowering shrub to grow into a single stem
tree is actually pretty simple. The younger the shrub
you start with, the easier it is to train. I have a
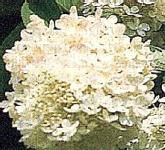
friend who grows thousands of Tree Hydrangeas a year,
and this is how he trains them. The variety that he
grows for this purpose is P.G. Hydrangea. (hydrangea
paniculata grandiflora) This is the one with the huge
snowball blooms.
He starts with rooted
cuttings and lines them out in the field about 30″ apart.
The first year he allows them to grow untouched as multi-stem
shrubs. Being a fast growing shrub, they typically produce
3 to 4 branches that grow to a height of about 3 to
4′ that first season. The following spring he goes into
the field, examines each plant and selects the one stem
that is the straightest, and is likely to grow straight
up from the roots if tied to a stake. He then clips
all of the other branches as close to the main stem
as possible. Then he pounds a stake in the ground as
close to the main stem as possible, and clips the tip
off the single stem that is left. This forces the plant
to set lateral buds just below where he clipped the
top off, rather than continue growing straight up. These
lateral buds will grow into branches that will form
the head of the tree. He then ties the stem to the stake.
As it begins to grow, any buds that appear below that
top group of buds are picked off to keep the single
stem tree form.
That’s all there is to
it. You can use almost anything as a stake, and just
tie the stem to the stake with a piece of cloth. I also
anchor plants to stakes with a single wrap of duct tape.
I find that if I only wrap the tape once, the sun will
dry the glue and the tape will fall off by itself in
about 12 months. ½” electrical tubing (conduit) also
makes a good stake, and is just a couple of bucks for
a 10 foot piece.
You can do the same thing
with an older established shrub if you can find one
branch that can be tied to a vertical stake. The stem
is likely to be crooked and not too smooth because of
the wounds from where the branches were removed, but
that doesn’t mean that you can not create an interesting
plant.
Some of the shrubs that
make beautiful and unique ornamental trees are many
varieties of Viburnums, Burning Bush, Winged Burning
Bush, Red and Yellow Twig Dogwoods, Weigelia, Mockorange,
Rose of Sharon, and Flowering Almond. I’m sure there
are many more.
My favorite shrub to train
into a single stem tree is Harry Lauder’s Walking Stick.
In shrub form this plant is extremely interesting with
it’s twisted and contorted branches. The new growth
is reminiscent of a pig’s tail. Using the same technique
as described above I select a single stem, tie it to
a stake, and train it to grow as a single stem tree.
The effect is totally unique. Call your local garden
stores and ask them if they have a Harry Lauder’s Walking
Stick plant.
Give it a try, I’m sure
you’ll have fun as well as create some very interesting
plants for your landscape.
Mike McGroarty
Budget
Veggie Gardens from Kitchen Scraps
by Ron Williams
It does not matter whether you put your Kitchen scraps
in the compost or the bin, did you know that you could
grow many of your favourite fruit or vegetables from those
scraps. Indeed, unless your compost is very well matured
you will find stray veggie seedlings may appear wherever
you deposit the compost.
Take for instance those
potato peelings, if it is a fairly thick section of
peel with an eye (shoot), then you can often get these
to grow into full potato plants. You can also get sweet
potatoes and taros to grow from sections of the tubers.
Have you ever tried to
plant or thought about trying to plant the seeds from
a particularly nice tomato, capsicum, chilli, watermelon
or pumpkin. While any plants grown from such seed may
vary quite a lot from the parent fruit, you can still
achieve fairly good results from them if you are on
a tight budget.
While the plants grown
from seeds of many of your kitchen scraps will not produce
fruit to the same high standard as the original fruit/vegetables,
this is because of the complicated interbreeding programs
put into place by the big seed companies. The progeny
can give a very wide range of resulting offspring in
relation to the size, quality and quantity of the fruit.
But if you come across one or two particularly good
plants in the resulting season, then reuse the seeds
of that and always-in future pick the best fruit from
the best plants for your future propagation material.
Though there are some
veggies in the kitchen where it is not possible to grow
them from the seed in the fruit. These are those vegetables
where the edible fruit is still in an immature state
and the seed is not yet viable. These fruit/veggies
include the cucumbers, okra, zuchinni and squashes to
name just a few. This is because the fruit when it reaches
a stage where the seed is viable is just too big and
coarse for human consumption.
If you leave the top of
a pineapple out in a shady spot for a week or so during
warm weather, then strip back the lower dead leaves.
You may even notice some small juvenile roots already
forming at the base of the plant top. One thing to remember
with pineapples is that it is a species of bromeliad.
And as such it requires the same moist but well drained
growing conditions.
When the garlic cloves
are starting to get a green sprout coming out of the
top, it is a pretty good indication, that it might be
a good idea to plant them out individually for a good
harvest in about 8-10 months time of this fairly expensive
herb plant. Treat it like any member of the onion tribe,
because they like moist, well drained soil and a fair
amount of feeding during the growing season. Harvest
as the tops are dying back. But let them dry out in
a cool but airy place, before you try to use them back
in the kitchen.
Why not try growing your
own peanuts (groundnuts), always only use the raw nuts,
and only choosing those nuts, which are still whole
and encased in the brown skin. Peanuts can be grown
during warmer weather in most temperate and subtropical
parts of the world. One of the fascinating things about
peanuts is that they are one of the only plants which
flower set fruit and then bury and preplant their own
seed ready for later germination. Yes the peanut, which
is dug from the ground, is actually a fruit buried by
the parent plant, after flowering.
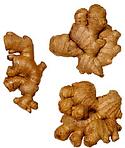
You can always grow your own ginger; all it takes is
a section of the root, purchased from a greengrocer.
Plant it in a well drained but moist soil. Allowing
plenty of room for the plant to spread out. You can
be harvesting your own ginger roots within about 8-12
months.
If you have a few dollars
why not look at purchasing some of the heritage or heirloom
seed ranges of Fruit and vegetables. Many seed firms
as well as organisations like the Seed Savers Network
have many fascinating and unusual varieties of plants
available for the home gardener to grow.
Of course once you have
various plants growing in your veggie garden don’t forget
to keep some propagating material back ( whether it
is root sections, seed or divisions), for future plantings.
Also you should think about letting certain plants like
lettuce, parsley and basil go to seed, for planting
later. I regularly have to weed my lawns around the
gardens for rouge seedlings of the above plants. Such
spare seedling weeds are easily replanted or swapped
with other gardeners for plants I don’t yet have, or
given to school and/or charity plant stalls. It is useful
to have weeds that other people want and are willing
to pay for.
While it usually not a
good idea to try and propagate most of the tree fruit,
simply from a time perspective and again because the
results can also be very variable. It is still interesting
to try even if you only end up getting a potplant out
of the results. It is possible to grow the seeds of
such trees as mangoes, citrus, avocado, apple, pear,
etc. While the fruit of some species simply have no
viable seed at all eg, bananas. There is however a few,
which readily lend themselves to home propagation eg,
pawpaw (papaya), tree tomatoes, unroasted coffee beans,
etc. I remember as a child, accidentally germinated
a coconut palm, from throwing the mostly eaten out shell
onto a garden bed for a few months. Another suggestion
for those of you out there, who are visited by birds
to your garden, why not take a handful of birdseed and
plant it out in an out of the way section of your garden.
These bird friendly plants like Sunflower, oats, sorghum,
etc, can be a real bonus for many native birds to supplement
their diet. Many of the seeds in any packet of birdseed
are very viable.
When my kids were younger
and I was showing them such wonders, I used have had
trouble convincing them that I could not do similar
things in growing and multiplying with a variety of
items of importance to them at the time, from toys to
chocolate, lollies and even coins.
Ron Williams is a Freelance
writer as well as being a Horticulturist and a Rehabilitation
Therapy Aid at a Psychiatric Hospital in Brisbane, Queensland,
Australia. He writes ezines for wz.com. He also owns
a diuscussion group about Australian Gardening, called
austgardens at groups.yahoo.com.
Belgian
Endives Flemish Style
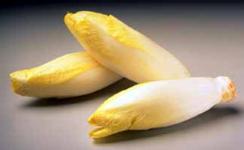
- 6 to 8 Belgian endives,
cored - 5 tablespoons unsalted
butter, at room temperature - juice of 1/2 lemon
- 1 tablespoon confectioners’
sugar - 1/2 cup water, plus
additional if needed - 1/2 teaspoon salt
- freshly ground black
pepper to taste - Salt and freshly ground
pepper - 3 tablespoons finely
chopped fresh parsley, for garnish
- Choose a stainless
stell or enameled pot large enough to hold the endives
in a single layer. Smear most of the butter on the
bottom of the pot. Cut out a round of parchment paper
to fit inside, butter the parchment paper on one side,
and set aside.
- Arrange the endives
in the pot and add the lemon juice, sugar, water,
salt, and pepper. Cover the endives with the parchment
paper, buttered side down. Place a plate on top of
the paper and cover the pot with a lid. The paper
helps the endive to steam better and the weight of
the plate gently presses them down into their own
juices. Cook over medium heat until very tender, 30
to 45 minutes. (Tender as butter). Check the water
once in a while and add a little more if necessary
to avoid burning the endives. Turn the endives over
once halfway through the cooking process.
- Carefully remove the
plate and the parchment paper. Place the pot uncovered
over high heat and cook to reduce the buttery sauce
to a dark syrup. Turn the endives over as you are
doing this to brown and caramelize them on all sides.
Sprinkle with the parsley and serve.
Organic Living ISSN 1492-5451.
Comments, questions, and
article suggestions can be sent to us at info@tvorganics.com

