|
Organic
Gardening Tips
Terra Viva Organics
Craving
Fresh Greens?
Get
Some Growlights Going
Starting
Hot Pepper Plants From Seed
Baby
Potato and Broccoli in Mushroom Wine Sauce
At this time of the year, the garden has been put to bed
and is producing very little for the kitchen table. Right
about now, gardeners begin craving all of those fresh
greens that were so plentiful during the growing season.
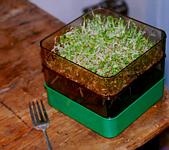
Sprouting seeds indoors
is one of the fastest and easiest ways to satisfy this
need for fresh greens. All that is required is sprouting
seed, a container, and 5 minutes a day.
A wide variety of seed
can be sprouted: alfalfa, fenugreek, lentils, peas,
radish, red clover, mung beans, cabbage seed, cauliflower
seed, broccoli seed, kale seed, garbanzos beans, barley,
rye, wheat, buckwheat, mustard seed and quinoa.
Many types of sprouters
are available on the market; most come with multiple
tiers so that different types of seed can be sprouted
at the same time. However, seeds can also be sprouted
in jars, tubs, or any kind of container that can be
covered so that the seeds will not dry out.
A tablespoon of seed is
enough to feed one person so only start a small amount
at a time.
- The first step is to
rinse the seeds, removing any that are broken or discoloured.
- Allow the seeds to
soak overnight in a bowl of lukewarm water.
- Rinse the seeds in
the morning and then place them into the container
and cover them.
- Place the container
in a warm spot, i.e. on top of the fridge.
- Twice a day, rinse
the seeds and drain.
You should have sprouts
within 3-5 days so refrigerate when they’re ready.
Terra Viva Organics carries
a whole range of organic sprouts as well as the Bioset,
multi-level sprouter which makes growing sprouts in
your kitchen easy. Click here
for our complete range.
Alternatively, you can
plant the seeds and harvest the sprouts as they come
up through the soil. This is very effective with wheat,
barley and rye. Not only does it help prevent molds
that grow on the unsprouted seed, many avid sprouters
report that the taste of wheat sprouts grown in soil
is much sweeter.
For more information,
you can visit the following websites:
Mumm’s Sprouting Seeds
The Sprout House
Wheatgrass & Mold
Or, you can refer to the
following books:
Sprouts: The Miracle
Food
A Complete Guide to Sprouting
By Steve Meyerowitz
The Sprout Book
by Mark M. Braunstein
The Sprouting Book
by Anne Wigmore
by Susan
Ward
Tired of leggy, floppy seedlings or being limited to the
space of your available south-facing windowsill? Get ready
for the seed-starting season by getting some grow-lights
ready to go.
If you’ve ever tried to
start seeds inside before, you already know that relying
on windows to give enough light in the winter and early
spring is a mistake. The early season light just doesn’t
have enough intensity and duration. While a great many
seeds will germinate well without light, once they germinate,
most seedlings require 12-14 hours of direct light to
manufacture enough food for healthy stems and leaves.
Without this amount of light, seedlings begin stretching
to find more light, thus producing leggy plants. Only
growing your seedlings under lights can solve this problem.
For the home gardener,
there are two types of light systems to choose from:
The priciest kinds of growlights available are the High
Intensity Discharge lamps (HID). They’re the most expensive
because they’re the most efficient; one 1000 watt HID
lamp can produce the same amount of light as fifty 40
watt fluorescent lamps. Both High Pressure Sodium and
Metal Halide HIDs are available, most commonly in a
400 and 1000 watt size. The 400 can supply enough light
for a growing area of about 16 square feet or a 4 x
4 garden. The 1000 can cover an area of about 7 x 7.
Unfortunately, an HID lamp costs approximately $200.
If you can afford it,
an HID light is great, but if you’re like most home
gardeners, there is a less expensive solution that is
ideal for starting seeds or cuttings; fluorescent lamps.
One fixture with two four foot lamps installed can cover
two 10×20 inch trays. The standard “shop light” fixture
will cost from $15 to $25; the fluorescent tubes cost
$4 through $8 each. To provide the full spectrum of
light to the seedlings, you should purchase both warm
and cool fluorescent tubes.
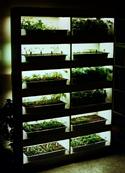
Because seedlings need
high light intensity, you want to keep your plants no
more than 3 inches away from the bulbs. To accomplish
this, I make wooden frames for my fluorescent light
fixtures, attaching a six inch piece of wood to each
side so it will stand on a table. Although the resulting
standing fixture isn’t terribly strong, this allows
me to put the seedling trays directly underneath the
lights where they need to be.
Otherwise, you can also
build your own shelving unit and hang the fluorescent
light fixtures on chains over the seedling trays. As
the plants grow, the chains can be shortened to provide
the seedlings with more headroom.
Once your seeds have germinated,
the lights will need to be left on for 12-16 hours a
day if you have no other light source. If you’re starting
your plants in a sunny window, you should still supplement
your seedling’s light supply with an additional four
hours a day of artificial light.
Starting seeds inside
and watching seedlings grow into strong, healthy little
plants is a pleasure that you shouldn’t have to forego
just because you live in an area with a long dark winter.
Putting together some growlight fixtures is a great
way to beat the winter blues and get ready to spring
into the growing season.
Susan Ward is a
freelance writer living in Comox, B.C. who has a passion
for gardening. She is the Suite101 Editor for Gardening
in B.C. and writes for magazines such as BackHome.
by Joe Arditi
GETTING STARTED:

The selection of hot peppers
available at the supermarket is very poor. Although
the selection of plants from a nursery or store is a
little better, when you start from seeds, there is a
terrific variety available. And as hot pepper popularity
is growing constantly, the varieties just keep expanding.
One catalog, Pepper Gal boasts over 200 varieties! So
for starters, pick out your selections.
MAKING THE PROCESS
EASY:
Soil: There are
many good seed starting mixes available at nurseries
or discount stores. They work very well and I would
recommend them as there is no mixing, measuring, etc.
If you prefer to make your own mixture, go with 1/3
good garden soil (don’t go with clay soil as it compacts
badly), 1/3 vermiculite or similar growing medium, and
1/3 sand. Hot pepper plants LOVE sand as many varieties
originate in areas with sandy soil. Also, it provides
excellent drainage. Mix all 3 ingredients together very
well.
Containers: I like
plastic gro-packs for 6 to 12 plants, peat pellets or
peat pots. Gro packs are especially good because you
can cover tightly with “cling-wrap” after first watering
and create a little “hothouse” environment. The soil
stays moist longer at a higher temperature. Just remove
cling-wrap when seedlings emerge. Put your soil/seedling
mix into containers. Don’t fill to exact top but leave
at least 1/4 inch for watering or it will run off.
LOCATION, LOCATION,
LOCATION:Some varieties can be finicky to germinate.
I recommend soaking seeds overnight in warm water to
give them a head start. Then sow seeds 1/4 inch deep
6 to 10 weeks before the last frost. Keep seeds moist,
but not soaked, through germination phase. They germinate
best above 65 degrees. Ideal is 75 to 85 degrees. Because
most homes are not this warm, another tip is to place
them on top of your refrigerator until seedlings emerge.
It stays pretty warm there. Don’t forget my cling-wrap
tip in a sunny windowsill. Again, be patient, some varieties
can take 4 to 6 weeks to germinate. Others can show
up in 7 to 10 days. It depends on temperature, sunlight,
soil and variety. After they emerge, seedlings prefer
at least 6 hours of sunlight, the more the better. As
they develop their first set of leaves I’ll snip off
with a scissors the weakest one. As they develop their
second set of leaves I’ll snip off all but the healthiest
one. Once you have healthy seedlings you’re ready for
the transplant and growing stage, then the harvesting
stage, then my favorite the cooking and eating stage.
Pepper Joe’s “Best
& Worst” hot pepper seed list:

- Best for small gardens
or container planting ..Thai, Tabasco and Pueblo.
- Best for dried powder
..Cayene, Turkish Cayenne, Serrano and Charleston.
- Best garden novelty
..Peter Pepper. Rated “most pornographic” by Organic
Gardening magazine.
- Most abundant yeild
..Bolivian Rainbow, Fatalli, Hot Lemon and Purrira.
- Pepper Joe’s favorites
..Golden Habanero, Barney, Jamaican and Fatalli
- Hottest ..Red
Savina, Caribbean Red, Orange Habanero, and Golden
Habanero.
- Worst..Bulgarian
Carrot (Tough skin, no flesh), Rocoto (hard to grow,
and a poor producer), and Mexibell (not hot at all).
Most varieties available at Pepper
Joe’s

|

