|
Organic Gardening Tips
Terra Viva Organics
Gardening
on a Budget
by Arzeena
Hamir
Once the buzz of Christmas has passed, the task of paying
off bills can leave many gardeners on a strict budget.
Gardeners who need to make frugal decisions at this time
of the year can take heart in a number of alternatives
that will not only lower the cost of gardening, but will
also enhance the pleasure! Here are five steps every budget
gardener should follow:
Plan ahead
Make a list of what you’d
really like to see in your garden and stick to it. There’s
no use growing winter cabbage, regardless of how lovely
it looks in the frost, if no one in your family eats
cabbage. A list will also keep you under control when
you see the end-of-season sales and are tempted to purchase
something on a whim. In addition, if you plan exactly
where plants are going to go, you won’t make last minute
mistakes such as placing sun loving plants in the shade.
Start a compost pile
It’s surprising to see
how many gardeners haven’t constructed their own compost
pile and still pay to have their grass clippings and
leaves hauled away and then, in turn, purchase fertilizers
every year. Compost is free food for the garden! It
helps break up heavy clay soils, absorbs water in sandy
soils, and encourages microbial life, thereby decreasing
that chances of any one disease becoming rampant in
the garden.
Compost piles don’t require
anything fancy. The walls can be made of recycled 2
x 4s, chicken wire, or even hay bales. All that you
need is access to the pile and enough space to turn
it every now and again.
What can you put in the
pile for free? Grass clippings and leaves are a great
choice since you probably have your own source as well
as your neighbours’. Check with local tree care companies
to see if they have any wood chips to give away. Coffee
grinds from the local café make excellent compost, as
does shredded newspaper. Don’t forget to include your
vegetable scraps and egg shells. Once you get hooked
on composting, you’ll even start going after the local
barber for hair, and even saving dryer lint!
If you’re an apartment
gardener or are cramped for space, a great alternative
to a compost pile is a worm bin. The requirements for
a successful worm bin include a good size container,
usually a Rubbermaid bin, about ½ lb of red wiggler
worms, shredded newspaper, and then a steady supply
of kitchen scraps. The resulting “worm casts” make excellent
fertilizer for garden & potted plants. For more
information, City Farmer has this article on worm composting:
http://www.cityfarmer.org/wormcomp61.html#wormcompost
Recycle
 Many Many
of the expenditures that gardeners make for containers
and equipment can be cut down by re-using items you
already have at home. Margarine tubs, yogurt & cottage
cheese containers and egg cartons are fantastic for
seed starting. Old gardening boots, wheelbarrows, and
toolboxes can make whimsical substitutes for expensive
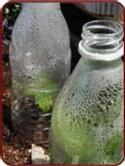
outdoor containers. Window frames can be converted into
cold frames and plastic milk jugs and pop bottles can
be used to make a mini greenhouses or hot caps.
Start from seed when
you can
One packet of tomato seed
is often equivalent to the price of one tomato start
yet you get the potential of at least 30-40 plants in
each packet. While it may take longer and require advance
planning, starting the majority of your plants from
seed can be a big savings, especially if you’re using
recycled containers. No need for expensive heat mats
– the top of the VCR or water heater is ideal. Fluorescent
tubes make a suitable substitute for expensive grow
lights and can be rigged up under a table or on a shelf
in the garage.
Don’t forget to try to
save your own seed during the season. Not only will
you save on the seed purchase the following year, but
you’ll also be able to select seed from plants that
you know did well in your climate. Most communities
now arrange for seed swaps in the early spring where
you can trade your excess seed for new varieties. Make
sure that you save seed from non-hybrid plants.
Choose plants that
keep on giving
In the vegetable garden,
climbing peas, tomatoes, beans & squash tend to
provide more produce than their bush equivalents. If
you’re limited in space, growing these plants vertically
can be very successful. In addition, plants like zucchini
are notorious for their yields. Trade with neighbours
for food you didn’t grow.
Among the flowers, try
growing multi-purpose plants to get more bang for your
buck. Many flowers like bachelor’s buttons, violas,
calendula, pansies, & roses are edible as well as
beautiful. Yarrow, alyssum, fennel, cumin, & coriander
all attract beneficial insects as well.
Find a friend
Not only can you share
ideas with a gardening buddy, but you can also share
the costs and make it cheaper for both of you. Very
few of us require a whole packet of seed for the gardening
season; most packets contain 40-100 seeds. Why not split
the packet with a friend or else trade seed for a variety
you didn’t buy? A gardening buddy is also a great person
to share tools with. If you’ve got a fantastic hoe and
your friend has an excellent pitchfork, why double up?
Sharing with a gardening
partner will also allow you to purchase certain inputs
in bulk. If you require potting mix, why not go for
the bale size instead of the small packages? Compost,
if you can’t make your own, is much cheaper if purchased
by the yard and shared with a friend or two.
Joining a garden club
is a great way to meet gardening enthusiasts if no friends
or family are willing to team up with you. Most clubs
also hold plant exchanges or sales where you can get
plants for a real steal.
 Arzeena Arzeena
is an agronomist and freelance gardenwriter. In
her free time, she runs Terra Viva Organics.
Plant
Presents from Your Own Garden
by Ron Williams
Whether you are looking for ways for you or your kids
to provide cheap presents for the extended family or you
are after ways of cutting the bill of Christmas gifts
this year, or do you just like to give gifts which have
a personal element to them then here is a suggestion or
two for you.
If you are looking to
make a present for the gardener in the family or someone
who has recently moved into their own home, someone
in a flat or unit, a person who can’t manage a full
sized yard, a family member who loves to cook with fresh
ingredients, etc. Then why not consider giving them
something from your own garden. Here I am talking about
plants that you have divided off from your own garden
plants.
There are many plants
growing in the average garden that can be divided, or
that have naturally self layered themselves. Where you
could go along and take a rooted section, pot them up
and with a bit of dressing up of the planting container,
you could produce a really nice gift for someone you
care about.
These plants include many
herbs as well as perennials or shrubs and even some
trees manage to send out self-layering branches or suckers
from the root system. Some perennials or bulbs will
increase their size or number of bulbs over time. All
of these provide you with an opportunity to cheaply
create a wonderful present for someone else.
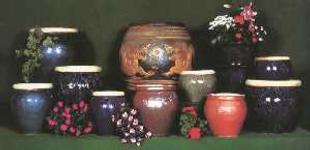
First things first you will need to obtain a number
of pots either plastic ones left over from additions
to the garden population, or from someone you know,
or you can go out and purchase a pot plastic/ceramic/terracotta
etc., to suit your needs. If the person you are giving
the plant/s to is not a real gardener, then you might
consider getting a pot with a waterwell in the base
to increase the plants’ chances of surviving.
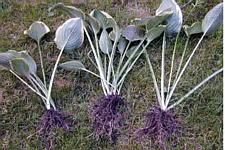
Next, you need to begin
looking for your plant material, so take a careful look
around your garden at the soil level. Check out which
plants are showing multiple stalks growing out of the
ground. Or those sprawling plants where a branch has
leaned over on to the ground and taken root along the
branch, maybe one where a branch has become buried under
the mulch. Or one where there is a sucker growing from
the soil a short distance from the parent plant. Another
possibility is seedlings growing in the garden a distance
from the parent plant material. Maybe there is a clump
of plants or a big patch of bulbs where you can do some
dividing. Many of these plants benefit from being divided
up or being allowed some more growing room in the particular
area where you have taken away some material.
Different parts of the
world will have a differing range of plant species,
which lend themselves to this form of self-propagation.
If you can’t find any plants that are doing this in
your own garden, why not look at a friends or neighbours
garden. Or you could maybe join forces and give a joint
present using plants from another family member’s garden.
Or another possibility is to buy a plant in a pot that
has several plants already established in it. Divide
that up before you use half in your own garden, and
still have half to repot and give away. Even if you
are not confident about your gardening skills you can
still pick up cheap plants at the local market, school/church
fair, garage sale etc. Repot them into a bigger or nicer
pot for a fairly cheap present, or possibly even right
up to shrubs and trees, (Including Topiary and Standards
or even Fruit trees).
Another possibility is
to multiplant a few different plants into a long/large
round tub. This will create an instant garden on the
move. Some themes you might consider here is herbs,
indoor foliage, bulbs, annuals, alpine/rock, cacti/succulent
or even patio gardens mixing some annuals and perennials.
 It It
is best to moisten the ground around the plant that
you are going to work on well before you do the dividing,
as this allows you to remove the maximum amount of root
mass during the dividing process. The first step is
to divide the clump or cut away the joining branch to
make the separate plant available. Then using a spade,
fork or gardening trowel, dig as far out from the potential
plant as practicable, because this will give you the
biggest root mass possible. Go down as far you believe
you need to, (this will depend on such circumstances
as size of new plant, species of original plant material,
type of soil, other plant or landscaping material around
the area, etc.). As gently as you can dig out the new
plant. Shake off any excess soil and refill the resulting
hole in the ground if necessary.
Prune back the foliage
of the new plant to roughly equal size of the root mass,
trying to protect some of the new foliage growth. Repot
as soon as practicable, so that the roots do not dry
out and die.
Another thing to consider
is what sort of pot you are gong to plant into; if it
is only a plastic pot then you do not need to prepare
it beforehand. However if you are looking at painting
it, then do this before you get digging.
When painting up pots,
you will need to do some preparation work for the paint
to stick properly. Plastic pots should have their surface
roughened up with a bit of sandpaper. While some terracotta
pots should have a primer applied to the outer surface
before you paint them. Try not to get primer or paint
onto the inside of the planter, because while most wont
there are still some paints which contain chemicals
that may affect or contaminate the soil and plant over
time.
Other possibilities for
decorating up pots include simply gluing on bits and
pieces including stones, tiles, buttons, sticks, shells,
ornaments, ribbon, stickers and decals, etc. Other ways
of decorating up a pot for the initial presentation
is to wrap up just the pot (not the actual plant).,
using either wrapping paper, cellophane, material, a
cheap teatowel or even hessian. Hold these wrappers
in place with string, ribbon, bandana, scarf, etc.
Other possibilities for
adding value to the potplant is to provide some growing
information and name tags for the plant/s included.
Other little quirks you might add include a personalised
name tag, (Hi, my name is David the Diffenbachia), or
a little watering indicator, miniature hand tools, small
amounts of fertiliser, pot ornaments, watering can etc.
So as you can see, creating
a very personal gift for just about anyone can easily
be within the grasp of anyone. Why not go out into your
garden and start thinking about what presents you can
be preparing for Christmas this weekend.
Ron Williams is
a Freelance writer as well as being a Horticulturalist
and Rehabilitation Therapy Aid at a Psychiatric Hospital
In Brisbane, Queensland, Australia.
Poinsettia
Selection and Care
by Georgiana
Marshen
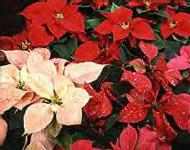
The poinsettia is the
official holiday plant and many of us either buy one
or are given one as a gift during the holiday season.
Here are some guidelines to help you choose and care
for this popular plant.
Selection
- Plants should have
an abundance of foliage that fills the stems all the
way to the soil line. The foliage should be a rich
green color.
- Bracts (the colored
part of the plant) should have color all the way to
the edges. Avoid plants that have too much green on
the edges of the bracts.
- Plants should be balanced
and full when looked at from every angle. The entire
plant should be in proportion to the container it
is growing in. As a standard gauge, the plant should
be 2½ times taller than the diameter of the container.
- The stems should be
stiff and showing no signs of wilting, breaking or
drooping.
- Plants that are on
display for purchase should be in an area where they
are not crowding one another, as air circulation is
critical.
- The soil should be
moist not waterlogged. If the plant is wilted and
the soil is waterlogged, chances are the plant is
suffering from a virus and should be avoided.
- If the paper or plastic
sleeve was removed during display, ask the garden
center to replace it before taking the plant home.
Chilling winds and temperatures below 50 degreesF
can cause plant damage.
Care
- Place the plant in
a bright sunny window but protect it from the hot
afternoon sun by using a shade or sheer curtain.
- The room temperature
should be between 68-70 degrees F.
- Water the plant when
the soil feels dry to the touch. Use the finger test-
stick your finger into the soil about 2 inches down.
Rub the soil between your fingers; if it feels dry
it is time to water. If it feels moist, wait another
day and retest.
- Fertilize the plant
after the blooming season only. The flowers are the
yellow centers of the bracts.
- Keep the plant away
from drafts or excessive heat.
- Poinsettias are very
sensitive to cold so don’t expose them to temperatures
below 50 degrees F.
- When watering, allow
the water to drain out of the container completely.
Do not allow the plant to sit in standing water the,
roots will rot.
Georgiana Marshen
is a master horticulturist and freelance garden writer.
She has been published in BackHome magazine and is a contributing
garden writer for American Profile Magazine.
Spice
Bags for Warm Drinks
from Seeds
of Knowledge
 Ingredients Ingredients
- 8 sticks cinnamon,
broken into small pieces
- 2 whole nutmegs, crushed
- 1/3 C. whole cloves
- 1/3 C. minced dried
orange peel (or 1/4 C. ground)
- 1/4 C. whole allspice
berries
- Optional: garnish with
cinnamon sticks, slice of orange, lemon peel
Combine all the ingredients
in a bowl. Tie in sachets of 1 tablespoon each in a
double thickness of cheesecloth; transfer to an airtight
container (perhaps into a canning jar with a decorated
lid and tied with a big bow!!).
One sachet will flavor
1 quart of cider, tea or wine. To use, simmer 1 quart
of the chosen beverage with 1 sachet for 20 minutes;
ladle into mugs.

| 
