|
Organic
Gardening Tips
Terra Viva Organics
Website
Update
Start
Healthy Tomatoes
Pollinating
Your Garden
Grow
Perennial Herbs from Seed
Chickweed
Herb Pasta
Planting in the favorable
signs and phases of the moon can improve the strength
and vigor of your plants, and give them every advantage
by working with the natural energy of the moon. Just
as the moon pulls the ocean tides, it also pulls the
smaller bodies of water, causing moisture to rise closer
to the surface during the waxing (increasing) moon,
or drawing the roots down in the waning moon.
Terra Viva Organics is
now providing a calendar
that pulls all the information together for your climate,
and keeps you on track for a more productive vegetable
garden. The calendar has these features:
- The best phase and
sign of the moon for planting and cultivating
- Lists when vegetable
and flower seeds can be started in flats or set out
in the garden
- Monthly reminders of
seasonal garden activities
- Shows daily moon phase
and sign, time of full and new moon
- Three climate versions
for short, medium and long growing seasons.
by Arzeena
Hamir
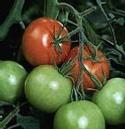
Tomatoes are one of the
easiest vegetables to grow from seed. However, unless
you live in the tropics, your summers are probably too
short to direct seed these heat loving plants. Starting
tomato seeds indoors gives them a jump on the season,
especially with late maturing varieties. Start seed
6-8 weeks before your last frost. Check www.almanac.com/garden/garden.frostchart.html if you’d
like to check your frost dates.
Tomato seeds themselves
are easy to handle and can be planted in any type of
container you have around the house: yogurt containers,
milk cartons, etc. Try not to use too small of a container
(egg cartons for example) or else you’ll be watering
more frequently.
The key to starting tomato
seed is to keep the seed moist. Pre-moisten the potting
mix so that it’s wet but not soggy. When you squeeze
it in your hand, no water should come out. The soil
should form a ball that falls apart when you poke it.
Fill your container and place 1 or 2 seeds on top, covering
them lightly with more soil. Next, cover the container
with either a plastic dome or saran wrap. Not only does
covering prevent the soil from drying out, it prevents
you from overwatering the soil as the seed is germinating.
In addition to moisture,
warm temperature is the key ingredient to helping tomato
seeds germinate. At 75-80 F, seedlings will emerge in
just 3-5 days. Bottom heat is best so place your containers
in a warm spot like on top of the water heater or even
on top of the VCR. Alternatively, you can use heating
cables or a heating mat under the containers.
Once the seedlings are
up, move them off the heat and provide them with lots
of light. If you have a bright, south-facing window,
keep them there. However, if you notice that your seedlings
are getting lanky, it’s an indication that you need
to provide supplemental light. Grow lights or fluorescent
shop lights can be used to keep plants short & stocky.
Suspend them close to the plants, no more than 4″ from
the top of the leaves.
Once the seedlings have
developed at least one set of true set of leaves, pot
them up into their own individual containers. Each time
you do this, add some fertilizer to the soil mix. I
find worm casts to be a great source of organic nutrients
that won’t burn the seedlings. Other options include
compost or half-strength fish fertilizer.
Each time you pot up your
seedlings, take off the bottom two sets of leaves and
bury the entire stem. Why? Tomatoes have this wonderful
ability to sprout roots along their stems. They are,
after all, related to potatoes. Burying the stem &
stimulating more root production ensures that the seedling
has a well-established root system that will withstand
the fluctuating moisture conditions in the garden.
by Taren
Urquhart
Have you ever seen what
you suspect to be a blue bottle fly entering that small
hole at the bottom of your screen door or investigating
nail holes left in your house siding? What you probably
saw was not a fly but in fact a bee!
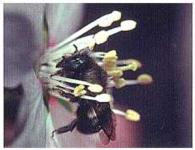
Blue Orchard Mason Bees
(Osmia Lignaria Propinqua Cresson) find nesting
holes in the most unlikely places. Since they cannot
excavate their own holes, they depend on others for
nest sites. Woodpecker drillings, hollow stems, roof
shingles, BBQ handles, and wind chimes are just a few
places these resourceful bees use to their advantage.
Now you are probably wondering
what does all this have to do with gardening? Well in
two words: Pollination Power! While one third of all
the food we consume in a day has been pollinated by
some hard working insect, many urban gardeners are having
trouble adequately pollinating their own fruit trees
and berry bushes. In recent years, the honeybee has
come under attack by several predatory mites.
Mason Bees have been able
to withstand these mites. Most gardeners will find that
them and other solitary bees are already present in
their neighbourhood; providing them with a plentiful
food supply, and a dry and clean nesting hole can attract
them. These bees are very docile and do not bite, they
are smaller than a honeybee and are black in colour
with a blue iridescent sheen. Since they are solitary
they do not swarm, but sadly they do not make honey.

The season begins in late
March with the newly hatched female mating and locating
a suitable nest. She then begins the tedious process
of collecting nectar and pollen to make a lump of “bee
bread” which she places at the back of her nesting hole.
She lays one egg on this food supply and then constructs
a mud wall, securing the developing offspring within
its own chamber. After repeating this process several
times she will reach the end of the tube and cap the
end with a final thick mud plug. In order to provide
her offspring with suitable protection from predators,
she intentionally lays female eggs first, in the back
cells, with males at the front. Production of female
progeny is most important in continuing the species
and they are best protected when concealed behind several
hapless males!
Blue Orchard Mason Bees
are fascinating insects and will provide you with hours
of enjoyment during the spring and summer months. I
invite you to welcome these bees into your garden this
spring and they will repay you with the very important
and essential service of pollination.
by Sharon
Hanna

Why grow your own perennial
herbs from seed? Well, for one thing, you can make hundreds
of lavender or rosemary plants for a few dollars. In
addition it is gratifying to grow something which is
not particularly easy.
Most ‘woody’ perennial
herbs are native to rocky/sandy semi-arid geographical
areas such as the seacoast of southern Italy or Greece.
The sharp drainage makes woody herbs very happy – try
to duplicate these conditions yourself when you grow
them. This means they absolutely cannot stand to have
wet feet, especially cold, wet feet.
Start perennial herb seeds
in early spring. For better germination, “stratify”
the seeds. This freezing and thawing duplicates nature,
and aids in breaking down the hard seed coat. Place
required number of seeds in a wet paper towel, and inside
a baggie. Place everything in the freezer, and leave
it for two or three days. Remove, thaw, then repeat
cycle.
To sow seed, mix 1 part
sand to 2 parts moistened seed starter mix. Clay pots
are perfect for germination, since water is less likely
to be retained than in plastic pots. Sow seeds sparingly,
barely covering. Do not add additional water! Secure
plastic bag over seed pots and set in a warm, bright,
well-ventilated place indoors or in a greenhouse.
Germination will be uneven
in 7 to 30 days. Observe your seeds daily, and when
seedlings emerge, remove the plastic bag.
Woody herbs grow slowly,
especially at first. Always water them sparingly. After
they are about 2-3 weeks old, they would like a bit
of compost or manure tea or really watered down kelp
or fish fertilizer. When the little herbs approach about
1 inch tall and are nicely leafed out, and you feel
confident you can handle them, knock the pot bottom
to loosen the roots. Gently remove the plants, roots
and all.
You’ll see that the roots
have put on a LOT of growth compared to what you see
above the ground. Carefully repot at the same level
they were in the original pot – do not bury the ‘crown’
of the plant under the soil. 4″ pots work well, either
clay or plastic is fine. The soil mixture should be
on the sandy side, not too composty. Don’t put them
out into the garden soil until they are about 4-6″ high
– most likely they’ll be ready to go in at the end of
the summer, around August or early September.
Feed your woody herbs
occasionally with dilute organic fertilizer. NEVER use
6-8-6 on them, or any type of chemical fertilizer. I
once lost a beautiful rosemary in a gallon pot by sprinkling
it in only lightly! Grow your herbs in full sun, in
well-drained soil. Raised beds or huge clay planters
are ideal.
Sharon Hanna is a garden
writer and avid cook. Read her latest articles on Themestream

|


