|
Organic
Gardening Tips
Terra Viva Organics
Organic Living
– Jan 02
Prepare
for Seed Starting
Mulch
and Feed Your Gardens for Free
The
Top 10 Things I Learned from my Garden
Pumpkin
or Winter Squash Soup with Fried Sage Leaves
Prepare for Seed Starting
by Arzeena Hamir
How do you satisfy the gardening itch in the middle of
winter? Easily! Start plants from seed. Now is a great
time to get a jumpstart on the gardening season. Just
a little preparation will help ensure you seed starting
success. Here is some of the equipment you’ll need:
Containers
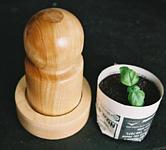 Almost Almost
any type of container can be used to start your seedlings
in, as long as it can hold moisture and is sturdy enough
to handle a wet potting mix. Gardeners have always recycled
yogurt & cottage cheese containers, milk cartons,
& even egg cartons. You can make your own containers
using newspaper and tools like the PotMaker. Whatever container you use, make sure that
it has a hole through which excess water can drain or
is porous and will eventually drain. Any sitting water
at the bottom of a container can rob growing roots of
oxygen and encourage fungal diseases.
Before filling your container with potting mix, wash
it well to get rid of any food particles. This is especially
important for containers that are reused year after
year. Certain fungal diseases, such as Fusarium, can
be spread through contaminated soil that is still hanging
on to the sides of containers. If your seedlings succumbed
to any diseases last year, make sure the containers
are rinsed with a 10% solution of bleach to kill off
any remaining spores.
Soil Mix
One of the most important factors when starting your
seedlings is choosing your potting mix. It is often
recommended to use a sterilized, soil-free starter mix
to prevent diseases such as damping-off from taking
hold of tender seedlings. I still recommend soil-less
mixes to beginner gardeners but I, myself, have started
to add compost and worm casts to my own mix. Here are
a few reasons why:
First, soil-less mixes are totally free of any nutrients
whatsoever. While young seedlings don’t require fertilizers
until they develop their first set of true leaves, I
find having to feed them solely through a liquid feed
quite cumbersome. Organic fertilizers like compost and
worm casts release their nutrients slowly and don’t
burn seedlings the way inorganic fertilizers may. Having
these fertilizers already in the potting mix means I
don’t have to worry about feeding for at least 5-6 weeks.
By then, I’m usually potting up the seedlings and adding
fresh fertilizer anyway.
Second, I have found that growing seedlings with organic
fertilizers in the mix tends to produce healthier seedlings.
The organic fertilizers help to mimic conditions in
the garden where there is a multitude of fungi, bacteria
and other soil organisms. Seedlings have to extract
nutrients from the organic fertilizers just the way
they would in garden soil. In contrast, I find that
seedlings fed solely with liquid fertilizers tend to
be less efficient at extracting nutrients since the
liquid feeds provide them in a highly soluble form.
Third, the organic fertilizers help the soil mix hold
moisture for longer periods of time. Most soil-less
mixes are a combination of peat, perlite & vermiculite
and drain very quickly. They require frequent watering,
especially when seedlings grow their first set of true
leaves and really begin to transpire. Both compost and
worm casts retain moisture well and keep it available
for growing roots.
Lastly, adding organic material into the potting mix
helps to stretch the mix and make it go farther. This
can be quite a cost savings, especially if your make
your own compost or raise worms yourself.
One word of caution about adding organic fertilizers
to your potting mix – remember that they will contain
a wide variety of soil organisms and your soil mix will
not longer be sterile. If you’ve had a problem with
damping-off in the past, i.e. you tend to overwater
your seedlings, you may want to only water your seedlings
from the bottom or else stay with a sterile mix.
Light
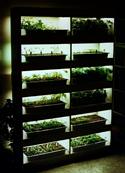 Have Have
you ever tried starting seeds inside on a windowsill
and found that they grew spindly and kept falling over?
Early spring light just doesn’t have the intensity and
duration that young seedlings need, forcing them to
stretch for more and more light. Most seedlings require
12-14 hours of direct light in order to keep them short
and stocky and producing healthy leaves. Therefore,
artificial lights are required early in the season.
Although you can purchase grow lights in your local
nursery or garden center, I find a combination of warm
and cool fluorescent bulbs just as effective at a fraction
of the cost. Since seedlings need high light intensity,
these bulbs need to be no more than 3-4 inches away
from the top of the plant. I attach the light ballast
to the underside of a shelf or even the underside of
a table and place my seedling trays under the tubes.
If the lights are still too far away, you can also raise
the trays on boxes. As the plants grow, the boxes can
be removed so that the leaves do not touch the bulbs.
Seeds
Last but not least, gather your seeds together and
select what you’re going to grow this year and how much
of each variety. If you have left over seed from previous
seasons and are not sure if the seed is still viable,
do a quick & easy germination test between moist paper
towel to see if the seeds sprout. Plant any seeds that
do germinate and discard any mould.
If you’re really itching to do some kind of gardening
now, you can start the following types of seed indoors
near the end of January/early February:
| Vegetables |
Flowers |
| Celery |
Aquilegia |
| Celeriac |
Myostosis |
| Leeks |
Perennial Alyssum |
| Giant onion |
Pansies |
 Arzeena Arzeena
is an agronomist and freelance gardenwriter. When
she’s not working on her garden, she runs Terra Viva
Organics.
Mulch and Feed Your Gardens for Free
by Ron Williams
 In today’s throwaway society, In today’s throwaway society,
there is absolutely no need to go out and purchase mulch
material for your garden, unless it is for the particular
aesthetic appearance sake of the mulch material.
Were you aware that there are a number of mulching
materials that you can obtain from around your own community
that are free, and some of which can be even delivered
to you for nothing as well?
Impossible you might say. Well I mulch my gardens fairly
heavily, and I never pay a cent for the mulch material.
As a matter of fact, most of the mulch is willingly
delivered to my home for nothing. As the former owners
are only too glad to see the back of it, as it would
cost them money, time and effort to find other ways
of getting rid of it.
I also combine these outside sources of mulch with
my own compost, weeds and other organic matter mixed
through to achieve a great result in my garden, and
so all that it costs me is time and effort.
So what am I talking about? While some of the below
list is delivered free, other items I pick up myself,
depending on time, circumstances, importance etc.
- Grass Clippings from other people in the
area or from lawn-mowing contractors.
- Wood shavings from local wood turners and
carvers, ( Do not use shavings from treated timber).
- Small amounts of solid fill from friends
who are excavating. This is to assist in raising garden
beds, in my heavy clay soil.
- Light prunings from shrubs which is shredded
by me or put whole into garden.
- Heavier sticks and logs, which are turned
into trellis, garden stakes, garden edges, seats,
frames, log planters etc. while they slowly decay.
- Newspaper, cardboard, non-rubber carpet underlay,
and even carpet and carpet squares – put under
other mulch to prevent grass and weed regrowth.
- Animal manures sometimes mixed with straw
from places like Racetracks and Showgrounds, Pony
Clubs, Stables etc. I contact them well beforehand
to see if any is available.
To this I also add my own weeds, throwing away some which
can still be a potential problem, or burying them below
the bottom most layer of mulch material to stop them regrowing.
Another item I add is any old potting mix from deceased
plants or when repotting plants. Being a fairly lazy gardener,
I throw the material around a bit at a time, as they are
available, and let nature mix them for me. On a couple
of occasions I have received a bit too much wood shavings
so these became path material between some of the garden
beds, with a heavy underlay of newspapers. People even
tell me that it looks and feels good underfoot. Never
put a large amount of fresh animal manure on any garden,
as it will burn any plant around it. Be extremely sparing
or let it age first for a few months before applying it
to the garden.
So what can you do to start locating your own supplies
of free mulch material? Here are a number of suggestions:
- Put a little sign near your gate, something along
the lines of ‘Organic mulch required’, or ‘Lawn clipping
wanted’. There are sure to be a number of local people
who are currently throwing theirs away in your community
or even local area. Never mulch solely with grass
clippings as they form an impenetrable layer that
air and water cannot get through. Always mix it with
other things to stop it ‘thatching’, just like a roof
over the soil.
- See if you can get into contact with local people
who are into woodturning and carving, or even local
sawmills. And come to some arrangement about unpreserved
wood shavings. Check the local phonebook for local
showgrounds/racetracks/stables etc, to find out if
any have stable or manure waste to give away, for
people willing to pick them up. In other words, start
talking around the place that you are after mulch
materials and they will soon start coming to you.
The only caution with using other peoples waste material
is the chance that you might also import other peoples
pests and weeds. I have rarely found it a problem because
of heavy mulch on mulch routines. But it is possible.
One point being that when you first start applying
mulch to your garden you may see some nitrogen deficiencies
occur in some plants. This is because the organisms
that are breaking down the mulch material are using
up all the available resources of it during the initial
breakdown. Once you have gotten past this time the old
composted material provide more than enough nitrogen
for future processes. Another thing to be careful of
is not to bury or mulch up against the stems of wanted
plants, as it may cause further problems for your plants
in rot problems around the collar of the stems and introduced
pests and diseases.
So get out there and talk around the community, find
the contacts, believe it or not they will be as grateful
as you to solve their particular problems of waste reduction.
As well as that, you may start making some new friendships
out of the deal; I know I have.
Ron Williams is a Freelance writer as well as
being a Horticulturist and a Rehabilitation Therapy
Aid at a Psychiatric Hospital in Brisbane, Queensland,
Australia. He writes ezines for wz.com. He runs his
own Website called Bare Bones Gardening. He also owns
a discussion group about Australian Gardening, called
Austgardens at www.groups.yahoo.com
impatients63@hotmail.com
http://www.geocities.com/impatients63/
The Top 10 Things I Learned from my Garden
by Susan Dunn
1. Weed
Planting seeds means that at some point you’re going
to have to remove some of the plants so that other ones
have the chance to grow and thrive. In the same way,
you only have so much space in your life and you need
to get rid of the tolerations so you can have the room
and the nutrients and the self-care to thrive and grow.
In the same way that you let the bigger, stronger plants
stay, concentrate on your strengths and let them grow.
2. If you keep doing what you’ve been doing you’re
going to keep getting what you’ve been getting
There’s a place in my garden that just needed a rose
bush. I planted 5 there. It’s like a blackhole. I went
on to try other plants. Whatever I planted there died,
and no matter what fertilizer, extra watering or xteme
care I gave, I was finally forced to admit that for
some reason nothing was going to grow there. I gave
up what was essentially an ego position and went with
the flow. It now is the place for my garden statuary.
3. On the other hand, If it ain’t broke, don’t fix
it — and don’t listen to other people!
I have another place in my garden where the geraniums
thrive all year round. My sister stayed with me a week
and she didn’t feel like I was watering my garden enough.
I started watering the geraniums and now they are spindly
and their leaves have turned pale and I question their
survival. It seems they were thriving on my benign neglect
and were very happy with the way things were.
4. Stay in touch with the soil and water- Stay in
touch with life
Some of my most peaceful moments take place in my garden.
I don’t wear gloves and I take off my shoes and walk
in the mud and turn the soil with my bare fingers. I
work with people and with ideas, and bringing my body
in contact with the soil keeps me grounded.
5. There’s a time to reap and a time to sow
You’ll learn the old elemental cycles of nature. There
will be those magnificent sparkling snapdragons for
just a few moments in the spring, panseys when it’s
too cold for anything to grow, and chrysanthemums in
the fall bringing back memories of high school football
games and mum corsages. Eventually the tomato crop will
come in and when they die, it’ll be time to plant the
broccoli. It’s our traditions and the cycles of the
year that bring meaning and order to our lives.
6.Delight in the abundant surprises of nature
The rose bush didn’t grow, and the impatiens didn’t
take off, but a crepe myrtle arose, a shoot from another
one about 5′ away, when I had no idea they propagated;
and the biggest surprise of all — out of nowhere some
chile petines arrived. I have no idea where they came
from, but they’re welcome as the day is long. Nature
provides.
7. Nothing tastes as good as something you grew
yourself
Invest yourself in what you’re doing and it will always
taste better. It’s the projects you really work hard
on that have meaning.
8. Find a partner who compliments you
One year the man in my life and I had a vegetable garden.
I planned it, with my usual enthusiasm, and plotted
everything out. He dug the holes and planted what I’d
planned with not much enthusiasm, but a sort of dogged
determination. I watched the things come up and was
thrilled, and then lost interest. He was the one who
faithfully watered, and weeded, and fertilized and kept
the crops going with no imagination, just hard work.
Then when the harvest came in, I cooked up great things.
He liked the meals and pronounced the garden a Good
Thing after all. I’m a Strategist who likes to plan
things all out and then turn it over to someone else,
someone who’s not a dreamer, to implement it. We were
a good team. Now the garden is all mine and I appreciate
all the more his former contribution. He may never dream
and vision as I do, and I may never have a taste for
doing the same thing day in and day out as he did, so
we made a good team and each learned things from the
other to incorporate into our lives.
9. Thorns and beetles and hornets and snails and
worms
I have cuts and scratches on my hands and arms, like
the wrinkles on my face — signs that I’ve lived and
been in touch with life. When I go out to the garden
I meet all sorts of critters that are part of life on
this planet and my companions on the journey. There
are bugs that want to eat the roses; and snails, whose
function I do not know; and worms that are making it
all possible; and hornets I must avoid. They quietly
go about their daily business, intent on their own thing,
which may or may not conflict with mine, and sometimes
we meet.
10. Butterflies
 Butterflies, Butterflies,
like happiness, just come and light on your shoulder.
Though I planted a Butterfly Bush, it didn’t attract
butterflies, but other things have. From time to time
(I think it’s a migration) butterflies arrive in my
garden while I’m doing other things. I can’t predict
their arrival, and my attempts to summon them didn’t
work, but still they come! I can’t make it happen, but
I can count on it happening just the same. Like happiness.
When it’s least expected it will arrive.
Susan Dunn coaches clients in a variety of different
areas and offers teleclasses and ecourses on current
topics. You can visit her on the web at http://www.susandunn.cc/
Pumpkin or Winter Squash Soup with Fried
Sage Leaves
from cooksrecipes.com
 It’s best to use It’s best to use
small hubbards, butternut, or any of those dark green
skinned squash varieties like Honey Delight or Kabocha
to make this soup. If you opt for the pumpkin variation
make sure you choose a pumpkin intended for cooking rather
than carving a jack-o-lantern. Except for butternut squash,
most winter squashes are difficult to peel, so halve and
bake them first.
- 2 1/2 to 3 pounds winter squash or pumpkin
- 1/4 cup olive oil, plus extra for squash
- 6 garlic cloves, unpeeled
- 12 fresh, whole sage leaves, plus 2 tablespoons
chopped sage
- 2 yellow onions, finely chopped
- Chopped leaves from 4 thyme sprigs or 1/4 teaspoon
dried
- 1/4 cup chopped parsley
- Salt and freshly ground pepper
- 2 quarts water or chicken stock
- 1/2 cup fontina, pecorino, or ricotta salata, diced
into small cubes
- Preheat oven to 375*F (190*C). Halve the squash
and scoop out the seeds. Brush the surfaces with oil,
stuff the cavities with the garlic, and place them
cut sides down on a baking sheet. Bake until tender
when pressed with a finger, about 30 minutes.
- Meanwhile in a small skillet, heat the 1/4 cup of
oil until nearly smoking, then drop in the whole sage
leaves and fry until speckled and dark, about 1 minute.
Set the leaves aside on a paper towel and transfer
the oil to a wide soup pot. Add the onions, chopped
sage, thyme, and parsley and cook over medium heat
until the onions have begun to brown around the edges,
12 to 15 minutes.
- Scoop the squash flesh into the pot along with any
juices that have accumulated in the pan. Peel the
garlic and add it to the pot along with 1 1/2 teaspoons
salt and the water and bring to a boil. Lower the
heat and simmer, partially covered, for 25 minutes.
If the soup becomes too thick, simply add more water
to thin it out. Taste for salt.
- Depending on the type of squash you’ve used, the
soup will be smooth or rough. Puree or pass it through
a food mill if you want a more refined soup. Ladle
it into bowls and distribute the cheese over the top.
Garnish each bowl with the fried sage leaves, add
pepper and serve.
Serves 4 to 6
Organic Living ISSN 1492-5451.
Comments, questions, and article suggestions can be
sent to us at info@tvorganics.com
If you enjoyed this newsletter, please feel free to
subscribe below. You’ll be sent an e-mail notification
whenever a new issue is posted. We consider your
e-mail addresses very private and do not make them available
to any other companies
Early Spring Starter Kit
If you just can’t wait
to start gardening, here are 6 varieties that you can
start indoors in late January/early February to help
you get a jump start on the season. Each kit includes
1 packet each of:
- American Flag
Leek
- Evergreen Onion
- Parsley “Plain”
- Cilantro
- Red Russian Kale
- Rouge d’hiver
Lettuce
|
 |
Regular price – $15
CDN, Sale price – $9.95

|


