|
Organic Gardening Gardening
|
 |
Small greenhouse – stands at approximately 1ft X 4ft when assembled. Perfect for starting seeds and protecting salad crops and young seedlings. |
 |
Large greenhouse – stands at approximately 2.5ft X 4ft when assembled. Protects larger plants in your garden or potted plants on your balcony. |
Low
Cost Season Extension
by Arzeena
Hamir
When the days start to shorten and night temperatures
dip, do you often look over longingly at your neighbour’s
greenhouse, wishing you too could keep plants producing
into the fall? Investing in a greenhouse, especially a
heated one, is an expensive step. For those of us who
aren’t quite ready to make the leap, there are a number
of inexpensive options to protect plants from wintry weather.
Cloches and cold frames
can help extend the harvest of summer crops into fall,
keep cool season crops growing through the winter, and
help plants get a good start in the spring. They can
protect plants from moderate frosts, and increase daytime
temperatures by 5-20 degrees F.
Cloches
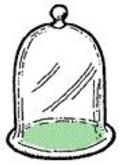
Originally, cloches were
constructed out of glass bell jars and were used to
protect individual plants. However, glass is fragile
and expensive. You can make similar cloches out of plastic
pop bottles or milk jugs. Cut off the bottoms, take
the lids off, and place them over individual plants.
If your plants are too
large or you have just too many you can adapt this method.
A cloche can also be constructed using ½” PVC pipe and
sheets of plastic at least 5 feet wide and about 10
feet long. Cut 4 pieces of pipe into 5-foot lengths
(angle the cuts) and bury each end into the soil at
least 6 inches so that you have what looks like a series
of crochet hoops. Space each pipe about 3 feet apart
and then drape the plastic over them. You can secure
the plastic by weighing down the ends with bricks or
rebar or clip the plastic right to the pipe with large
bulldog clips. Alternatively, you can use 10-gauge wire
instead of the PVC pipe.

Cold frames
Cold frames are very much
like mini greenhouses but with solid sides. They can
be constructed using storm or sash windows and a simple
wooden box or bricks for the base. No bottom is required
which enables you to just lift the cold frame and move
it around your garden. One trick to keep in mind is
to make sure that the back of the box is about a foot
higher than the front so that you can angle the lid
and take advantage of as much sunlight during the winter
and early spring.
Floating row covers
Floating row covers, often
sold as Reemay or Agrofabric, are made of spun-bonded
polyester or spun-bonded polypropylene. The fabric allows
light, water, and air to move through but enables you
to have 2-8º of frost protection. The row covers are
available in a variety of weights but for frost protection,
0.5 ounces per square yard is the minimum requirement.
Although the fabric is
light enough to “float” over your plants, winter winds
can cause abrasion so the cover should be supported
with wire hoops or short stakes. To prevent the cover
from blowing away, the ends should be weighed down with
stones or buried right into the soil. Remember to leave
enough slack to allow room for your plants to grow.
The lifespan of the row
cover is usually 2 seasons. When the fabric becomes
a bit too ratty, use it to help germinate seeds. Placed
over bare soil, row cover fabric acts as a mulch, keeping
the soil moist and raising the soil temperature slightly.
Seeds germinate very well in these conditions.
There are few points to
keep in mind before deciding which method of season
extension to choose.
- Temperature differences
– plastic will raise temperatures much higher than
row covers. While plastic is great for winter lettuce,
cool season crops like cabbage and kale don’t need
such high temperatures. - Materials –
not all plastics are alike. Make sure the material
you use is UV treated and at least 3 mil. thick. Non-treated
plastic will degrade and crack within just one season.
- Moisture – If
you use glass or clear plastic over your plants, remember
that water doesn’t come through and they will need
watering from time to time. Floating row covers don’t
have this problem. - Ventilation
– On sunny days in the early fall, it’s easy for temperatures
within cloches and cold frames to go up more than
20 degrees over ambient temperatures. Ventilation
will not only keep temperatures moderate, but it will
also help bring down humidity.Resources:
Terra Viva Organics
http://www.tvorganics.com/main.cfm?action=showfeature
– mini greenhouse kits $12-$25.Gardener’s Supply
Co. http://www.gardeners.com/ – floating row covers, plastics
Johnny’s Selected
Seeds http://www.johnnyseeds.com/ – row covers, plastic mulch
Arzeena
Hamir is an agronomist and President of Terra
Viva Organics. When she’s not planting peas or picking
zucchini, she answers questions about organic gardening
at: advice@tvorganics.com. You
can also read her gardening articles on Vegetable
Gardening at http://www.suite101.com/join.cfm/47083
Hold
Your Waterby Sharon
HannaThe Ten Commandments
of Water ConsciousnessLately I have been
noting with some alarm the frequency with which
the preciousness of water is being regarded. Here
are some hints to help you conserve water, loosely
adapted from the latest American Landscape Nursery
newsletter. Use this info for yourselves and don’t
be afraid to remind your neighbours. They will appreciate
it in the long run, and so will the planet.- Place your plants
in groups according to the amount of water they
need. This way, you won’t over- or under-water
parts of your lawn or garden. Sloping garden?
Place drought tolerant plants at higher elevations,
and thirsty ones at lower elevations. The water
from the higher areas will trickle down to the
water-demanding plants. - Always water in
the early morning, before 9 or so. Mid to late
afternoon watering loses much to evaporation,
and evening watering encourages diseases such
as mildew. (You’d be sick too, if you went to
bed wearing wet pajamas) - Water slowly and
deeply. Wear a walkman, or practice meditation
as you water. Use the opportunity to slow down
and get up close and personal with your plant
material. More and more I find myself forgetting
what is out there, and time flies. It is a delight
to be surprised by the first indescribably red
flowers of Lobelia cardinalis.If you like to water
by hand, watering wands are effective, and put
the water where you want it to go. - Invest in a new
good-quality sprinkler, and throw away your leaky
hose. Leaks waste water. - Avoid placing watering
devices where they waste water on your driveway,
deck or porch. - Keep up with regular
mulching, pruning, composting, and taking care
of your plants. Strong plants require less water
than weaker ones. - Mulching holds
in moisture, and reduces evaporation. Use grass
from the mower, shredded pea vines, or whatever
is handy. Even newspaper makes good mulch. - Avoid babying your
plants (except newly-planted ones). Like people,
plants need to “work out” to develop strength.
It’s fine to pamper the newly-planted, as they
need time to establish strong roots. - Keep the garden
reasonably weed-free, as weeds compete for water.
Move container plants to shady areas during particularly
hot and sunny spells. This will not only reduce
water loss due to evaporation and watering, but
keep your plants from blowing out in the heat.
- Use a drip watering
system. This can save up to 60% of the water used
by sprinkler systems. - If you can stand
it, practice ‘letting go’ – let your lawn go dormant.
According to some experts, we may not be lucky
enough to have a choice one of these days. - Choose an alternative
to lawn such as wild flowers or tough ground cover.
Most lawn grass will re-appear and green up quickly
when (is there any doubt?) the rain returns.
© Sharon Hanna,
Horticultural Writer for Terra Viva OrganicsThe
Bulbs Are Coming!by Don
TrotterHello Fellow Earthlings,
and welcome to one of the most exciting times of the
year for gardeners. The Bulbs are Coming! Soon there
will be an abundance of new fall bulbs in garden centers,
nurseries, and home center garden shops for you to
drool over (I always do). This discussion will be
on how to prepare a site for those little gas tanks
of color before you actually plant them. This way,
when you do bring them home, a healthy plot will be
waiting for them. But first a little background on
bulbs.A very large group
of plants that store energy in fleshy capsules during
their dormant period are referred to as bulbs. Only
a few of these plants are true bulbs. Tulips, Lilies,
Onions, Amaryllis, and Daffodils are some true bulbs.
Gladiolus and Watsonia are classified as corms.
Begonias, Ranunculus and Dahlias are classified
as tubers. All of these plants store energy in a
fleshy gas tank that allows them to live during
harsh weather. This storage organ is commonly called
a bulb. Enough science, let’s actually talk about
growing them.Different types of
bulbs require different methods of care. Some bulbs
like tulips, hyacinths, and crocus may actually
require that you refrigerate (not freeze) them for
several weeks before planting. This is to stimulate
a true dormancy response from the plant. Here in
Southern California we are forced to perform this
yearly ritual of digging and chilling our bulbs
if we want to have these types of bulbs in our gardens.
This is because the soil does not get cold enough
during our mild winters to send the plant into dormancy.
Other bulbs like narcissus, some daffodils, freesias,
gladiolus, and watsonia will just grow and grow
with little or no effort on our part. A little food
in the spring and once again in the early summer,
and they are totally happy. Other bulbs require
that we dig them and store them in a cool, dry,
dark place until it is time to set them out to grow.
Tuberous begonias are this type of bulb. Bulbs that
are actually rhizomes like bearded iris are another
plant and forget type. The one thing all of these
plants have in common is that they really appreciate
it when a gardener takes the time to prepare a healthy
bedding area where they are to be planted. I have
a tried and true formula for site preparation when
considering bulbs in our gardens. It has worked
for me for years and is very simple to do. So let’s
do it!First I think about
which bulbs I will be putting in the garden and
make sure that they will get the best sun exposure
I can provide them with my site conditions. I then
lightly cultivate the soil in the area where the
bulbs will be planted. I then put out a little mixture
of minerals and nutrients for them so the soil has
a chance to digest these supplements before I actually
set out the bulbs. This proactive approach to bulb
gardening has been in practice for centuries in
Europe and still works today. The last thing I do
is apply what?, yup, you got it, MULCH! A three
to six inch layer of good organic compost as mulch
over the soil and the minerals will loosen the soil.
It will also add essential organic matter, and increase
the availability of future nutrition to the bulbs
by activating a legion of beneficial microorganisms
that process these ingredients into plant foods.
My favorite thing about this exercise is that when
I do bring the bulbs home I’m not wrestling with
the soil to dig holes. This bed preparation method
really makes the hardest soil easy to work in within
just a few weeks. My little mineral mix consists
of the following ingredients:1 part cottonseed
meal
1 part alfalfa meal
1 part kelp meal
1 part Kelzyme
1 part soft rock phosphateI put this mix down
at a rate of five to seven pounds per 50 square
feet of bulb garden and then add my mulch. By using
this mixture you will ensure that your bulbs will
be happy and healthy when they emerge in the spring
to shower you with color. This mix and the mulch
will help your soil quality as well for future plantings.
The really great part is that you only need to apply
it once a year. I like that.Got Questions? Email
the Doc at Curly@mill.net Don Trotter’s natural
gardening columns appear nationally in environmentally
sensitive publications. Check out Don’s books for
lots of helpful gardening tips Natural Gardening
A-Z, The Complete Natural Gardener, and soon to
be released Rose Gardening A-Z, all from Hay House
Publishing www.hayhouse.com and available at all
bookstores and on-line booksellers. - Place your plants