

SEED QUALITY
Only the highest-quality seed, purchased from a reputable source, should be sown. It will probably have been prepared by acid extraction, to reduce the chances of spreading any seed-borne diseases. Most seedsmen supply their seeds in sealed laminated-foil packets, to prevent moisture absorption and loss of vitality. Seed stored in these sealed packets retains its germinating power for several years. There is little point in saving your own seed but if you decide to do so you should extract it by the hydrochloric-acid method. Do not save seed from any F1 hybrids—they do not breed true to type.
There are about 150 to 250 tomato seeds in a gram; usually 100 to 200 good seedlings are obtained from each gram that is sown. The weight of a seed varies considerably, according to the variety and the conditions under which it has been produced.
HYGIENE
Strict hygiene during propagation is essential. The whole crop can so easily be jeopardized by diseases or pests becoming established during propagation. Give careful attention to all the containers, the propagating media, and your working methods. Make sure you take every possible precaution to prevent the introduction of any disease.
PROPAGATING HOUSE
Small propagating houses with fixed benches are not suitable for raising tomato plants and are uneconomic. An ordinary tomato house is quite suitable, provides better working conditions, and is easier of access. If plants you are growing are too few to fill a whole house you should consider dividing off with a polythene-film-covered wall the section they do fill. This will avoid having to heat the whole house in winter.
SOWING SEED
Seed is usually sown in compost, in seed boxes. They must be clean–either new or recently sterilized with steam or chemicals. The `John Innes’ soil mixes are ideal for seed boxes. Fill them to about 20 mm below the top. They should then be firmed and leveled before you add a thin layer
of compost that has been sieved through a 3-mm sieve. It is best to soak the box in a shallow tray of water until it is thoroughly wet before the seed is sown. The boxes should stand for a while after soaking to allow any excess water to drain off. Two to four hundred seeds are usually sown in each box. This gives a thin, even covering over the box. The seeds are covered with a 3- to 5-mm-thick layer of finely sieved (3 mm) soil.
GERMINATION
The best temperature for germination is between 21 and 24 degrees Celsius. Germination will occur at much lower temperatures, but it is considerably slower. Higher temperatures increase the proportion of `rogue’ or `Jack’ plants produced by most varieties. It is usual to cover the seed boxes with glass and paper during germination and to turn the glass daily so as to remove any condensation. Properly prepared boxes should require no watering between the sowing of the seed and the emergence of the seedlings.
Any attempt to heat whole glasshouses to the ideal germination temperature is likely to prove uneconomic, but local tern-. Peratures can easily be regulated. A bench can be heated by electric soil-warming cables that are controlled by thermostats. Another method is to build a polythene-covered chamber in a shady area and install a tropicalized electric fan-heater and thermostat, with a tray of water to maintain a high humidity. This chamber should not be inside a glasshouse—excessively high temperatures could build up during quite brief periods of sunshine.
A high humidity at the time of their emergence helps the seedlings to shed the seed coats.
PRICKING OUT
Seedlings should be pricked out when the cotyledons (seed leaves) are fully expanded and lying horizontally. In a temperature of 21 to 24°C the seedlings will be ready on the tenth day after sowing. Before pricking them out loosen them by sliding a small wooden label under the roots. Lift the plant by one of the cotyledons—not by the stem, which may cause damage. Only vigorous, healthy seedlings should be pricked out. Discard any plants whose cotyledons are caught in the seed coat. Do not attempt to remove the coat if it is stuck on to one of the expanded cotyledons. In doing so you may transfer tomato mosaic virus from the coat to the seedling.
GROWING ON COMPOST
The John Innes potting compost that contains double the rate of base fertilizer (JIP2) is strongly recommended. Extra phosphate may be required —many New Zealand loams are strongly phosphate fixing. The potting compost you use should be sterilized, preferably with steam. In steam
Sterilizing loam-based composts you must be careful not to cause manganese toxicity in the seedlings. This can generally be avoided by steaming the loam, peat, and sand separately before you mix them with the base fertilizer. The components can all be steamed at the same time and layered in the same batch, as long as they are not mixed. If the loam is very acid, liming it to about pH 5.5 to 6.0 before you steam it is recommended. The usual amount of lime should also be included with the John Innes base fertilizers.
CONTAINERS
Plants raised in boxes have proved to be greatly inferior to those that are raised in pots or soil blocks. The size of the pot or soil block is most important; 76-mm-diameter hexagonal soil blocks and 100-mm-square plastic pots have been found adequate.
TEMPERATURES
Overseas research has shown that night temperatures of 16° to 17°C, with day ventilation at 21 °C, are best for raising tomato plants. In New Zealand, plants grown at these temperatures have performed well. They have become established rapidly and produced good early yields. At lower night temperatures (12° to 13°C) plants grow and bear fruit more slowly, but produce larger trusses. Plants that are raised in cold houses (minimum temperatures above 2° to 3°C) have trusses that are not much larger than those raised at 12° to 13°C but they do take much longer to propagate, establish more slowly, and their fruit is ready for picking very much later.
WATERING
Tomato plants must have ample water while they are in the propagating stages, but it is equally important not to water them so much that its nutrients are leached out of the potting compost. Any attempt to produce `hard’ plants by restricting the water supply will result in small, dark-green plants which produce lower yields than softer plants that are grown with plenty of water. Watering daily is recommended in good weather; less frequently in dull weather.
To judge the amount of water to put into a plastic pot is difficult. You should turn out a few plants each time you water and check that the soil at the bottom of the pot is moist but not too wet. In heated glasshouses the young plants can be watered from overhead with a small-bore hosepipe fitted with a fine rose; there is no need to worry about wetting the leaves. Young seedlings in cold houses can be watered in the same way, but there may be less disease risk if larger plants are watered in their pots, with a small hose running slowly and keeping the foliage as dry as possible.
SPACING
Watering and spraying are easier when the plants are standing on the floor of a glasshouse rather than on benches in a propagating house. The floor should be raked level and covered with black polythene. This prevents the plants from rooting down into the floor and helps to prevent the soil structure from being damaged during the propagation period.
Plants that are standing `pot thick’ in beds on the floor require the least labor for watering. They can be `stood out’ in this way immediately after being pricked out. They should be spaced out as soon as the leaves of adjacent plants begin to touch; there should be 15 cm between each plant and its neighbors.
Spacing out is necessary if short, stocky plants are to be produced. Overcrowding will result in tall, spindly plants with high first trusses. If they are standing pot thick in a large single bed in one section of the glasshouse, considerable labor will be needed to space them out.
While they are standing pot thick, plants should be in relatively small beds, close to their final situation. In the type of layout shown on p. 30 no plant has to be removed more than 1 m during the spacing-out operations. Rogue plants and any that are not up to standard should be discarded then. Pegs are needed at the corners of the plots to prevent plants from being knocked over by the hoses.
PLANTING OUT
As a general rule, planting out early produces earlier and better yields than does late planting. However, if the temperature, light, or soil-moisture conditions are unfavorable, early planting will increase the risk of plants `bolting’ and of aborting flowers on the first truss. Growers who know from experience that bolting risks are low should plant out 6 weeks after sowing. If there is any risk of them bolting, the plants should be held in the propagating house until the first flower is visible. For winter plantings this will normally be about 8 weeks after sowing in heated propagating houses or 8 to 10 weeks in cold houses.
PLANTING
Planting methods vary, not only from one district to another but also within a single district. One point that has become evident in recent years is that a given area of ground has a certain potential yield. Plants that have adequate breathing space may not produce a greater yield per unit area but an increased yield per plant is likely. Each plant benefits from having more light and air and there are fewer to string and to trim. Also, the fruit tends to be larger. Our staff have settled on 0.28 m2 as the optimum area for a tomato plant. Other districts favor very slightly closer planting. In many areas the F1 hybrids are the most popular. Their extra vigor is wasted if they are planted too close.
Some growers prefer single rows 75 cm apart, with plants between 35 and 40 cm apart. Others prefer a double row and a wider walking path. The rows are usually about 60 cm apart and the walking path is about 90 cm wide. In some districts the glasshouse is planted lengthwise; in others crosswise planting is preferred. You would be well advised to discuss the subject with your local horticultural advisory officer.
Trickle irrigation in one form or another is becoming universal. If you lay out the harness before you begin planting the trickle nozzles will show you where to put the plants. There should be no more than 10 cm between the nozzle and the base of the plant. On soils which tend to pack it is a good idea to make a slight depression near each plant. This will check the run-off of the trickle feed. The plant should be a good deal deeper than it was in the soil in its container. This will cause a secondary root system to develop above the primary roots and give the plant greater feeding ability and greater stability. The soil in which the plants are set out should be neither cold nor unduly wet.
TRAINING
Plants are supported as they grows by gently twisting around them a length of binder twine that hangs from an overhead wire about 2 to 3 m above soil level. The plant is tied in a fairly loose reef knot below the second or third leaf from the ground. Always be careful in tying and twisting. Any damage to the plant, even a mild abrasion, can be a point of entry for grey mould (Botrytis cinerea). Laterals should be removed about once a week, beginning about 3 weeks after planting.
They readily bend and break off from a healthy plant. If this work is carried out under dry conditions there is less risk from botrytis. The same applies to unwanted foliage. As the leaves grow older and larger they shade one another and are less effective in manufacturing carbohydrates. Removing them improves the air circulation, which also reduces the risk of disease.
A sound general policy is to leave at least the top 1 m of foliage on the plant and to remove the rest. Trimming should be carried out even after the plants reach the wire. The training methods at this level vary. The inverted arch system was tried and found successful at Levin. A pamphlet describing it is available from your local MAF office. About 6 weeks before the crop is to be pulled out the plants may be stopped one leaf above the flowering truss. This encourages the upper trusses to swell, so that there is a minimum of unripe fruit at cropping time.
Too often training over the wire is done only when there is time for it. This is a pity—to neglect it is likely to significantly affect the yield.
WATERING AND FEEDING
DAILY WATER REQUIREMENTS
When something goes wrong or is out of balance the grower must be able to recognize it quickly. He must also be able to determine the average daily needs of all his tomato plants. The local horticultural advisory officer (Master Gadener) is usually able to draw on his local knowledge and suggest a watering schedule suited to the particular crop, soil type, and growing season. This serves as a basis but should be adjusted from time to time, as necessary.
An evaporimeter provides a more accurate estimate of the daily requirements. A simple and effective one was designed overseas. A round tray is made by slicing 10 cm off a 200-1 (44-gal) drum. A brass or copper point is welded on to the center (or pointing inward and downward from the top edge) to act as an indicator. The tray contains about 7.5 cm of water. It is checked daily and, when necessary, replenished to exactly the same level. The tray is painted inside and out with a white, anticorrosion protective paint. A tray that is cut from a 200-1 drum is approximately 570 mm in diameter. It has a surface area of 2568 cm2, which is very close to the recommended area for a tomato plant (equivalent to one plant per 2510 cm2). Experiments have shown that there is a close correlation between the amount of water that evaporates from such an open water surface and the total water loss from a similar area of glasshouse soil plus plants. The evaporimeter is, therefore, a guide to the water loss from the whole glass-house.
It is advisable to average the loss from at least two evaporimeters in each glasshouse. They are best placed on or above the collarties, and in average conditions of temperature, sunlight, and air movement. They should be kept well away from ventilators and heating pipes, and out of any shadows.
Theoretically, the amount of water to be added to the evaporimeter each day should be equal to the amount that is needed by each of the plants to replace the water it has evaporated. In practice, there is usually a slight difference—solar radiation is not the only thing that affects the plants’ water uptake. The condition of the soil, its soluble-salts status, the type of heating system, and the health of the plants are some of the other things. The positioning of the evaporimeters, even when carefully done, may also introduce some error; however, it will be constant for the time of the year and the stage of the crop. Once determined and recorded, it can be used unaltered from season to season.
It is best expressed as a multiplication factor. Supposing that the evaporimeters need an average of 400 ml each day to keep their levels steady. Theoretically, the plants should also need 400 ml of water each through the trickle system. Reading the plants and the occasional soil check may indicate that not quite enough water is being applied after a week a double watering may be needed to restore the soil moisture level. This double watering supplies an extra 400 ml, which represents the under‑watering of a week—therefore 400/7 = 57 ml more water per day should have been applied.
Instead of the 400 ml, 457 ml or 1.1 times the evaporimeter reading was required. This 1.1 multiplication factor should be noted down and used to convert all future evaporimeter readings. (A reading of 500 ml will require a 500 x 1.1 = 550-ml watering, etc.) The actual multiplication factor can run from 0.9 to 2.0 but is usually between 1.3 and 1.4.
With a uniform cropping plan and provided there are no drastic alterations to the glasshouse or in the situation of the evaporimeters, the multiplication factors, once recorded, can be used each season, again and again. A set of notes incorporating these factors should be kept in each glasshouse, somewhere near the container that is used to check the output of the trickle harness.
Remember that it will always be necessary to keep an eye on the development of the plants. The watering rate must be cross-checked from time to time, so you will need to develop the ability to `read’ your plants.
TRICKLE IRRIGATION
Most of the tomatoes grown in locally are watered and fed by `trickle irrigation’; one or two outlets near each plant provide it with water and dissolved nutrients. Most of the systems release very little water at each watering point (about 1.5 l/h) to make it possible to water as many plants as possible from a single tap. For instance, a B.S.P. standard 12.7-mm (1/2-in.) Tap with an output at ordinary mains pressure of, say, 2400 01 used at a drip rate of 1.5 1/h per plant will water 1600 plants at the same time.
There are several methods of watering through permeable plastics. Some commercial systems rely for their output control on small nozzles, where the water is forced through a screw thread. Lately, so-called `micro-tube’ systems have come into use. The trickle is gained by passing the water through short lengths (up to 60 cm) of very small-bore polythene tubing (0.875 mm). Microtube systems can be made quite easily at home and are cheaper than the traditional nozzle systems. They all distribute
Water through several large-bore (25 mm or so) plastic or rubber hoses that run the length of the glasshouse. They have smaller laterals (9 to 12 mm) that branch into one for each plant row and into which one or two nozzles or microtubes are inserted alongside each plant. Usually a water-fertilizer mixture is applied; it is rarely water alone. There are various ways of injecting the fertilizers into the irrigation water. Readily soluble fertilizers can be dissolved directly into a raised feeder tank. A strong fertilizer stock solution is usually made up by dissolving the fertilizer in hot water. This is stored in a container that has a diluter head to feed the solution into a stream of water passing through at a set rate. The diluter head and the container with the fertilizer are connected in line between the tap and the distribution system (usually called a `harness’).
To avoid any plant sitting continuously in a puddle, you should make sure that there is an outlet about 10 cm away from the base of each plant. It is advisable to make especially sure that the outlets of microtube harnesses are firmly in place; home-made wire staples are useful for this.
TRICKLE IRRIGATION AND FEEDING
Trickle irrigation is a labor-saving device—it cannot completely replace hand watering and the application of fertilizers by hand without some detriment to the crops. Its main weakness is the lack of horizontal spread. On nearly all soil types, regardless of how much water is applied, there is a tendency for the moist zone under each outlet to grow smaller and for the soil between these areas to dry out. The roots of the plants thus become confined to a very small area. This forces them down deeper, below the level of sterilization, into soil which may be diseased. It also makes the plants very sensitive to any irregularities in the watering and feeding programmes—the buffering effect of the greater volume of soil is lost.
You must therefore try to maintain the area of the moist soil and of the plant roots.
The best ways of doing so are the occasional use of the hose and the use of low-trajectory sprinklers late in the season. These treatments should begin as soon as it is obvious that the area of soil that is kept damp by the trickle outlets is contracting. You can see this from the surface, but preferably during a period of settled, bright weather. You will need to repeat this observation every 4 to 6 weeks. Any watering should be either preceded by a dry side dressing of at least 25 g/m2 of sulphate of potash or followed by at least z 1 of strong (1 in 100 or 1 in 150) high-potash trickle feed. This prevents the plants having access to water with a low salts content, which may lead to ripening disorders.
An alternative and possibly more labor-saving way is to take each pair of trickle laterals and place one between the pair of plant rows and the other in the path. The water can then be spread by moving the outlets 10 to 15 cm at a time, applying about 1 of trickle solution to each new position before moving the outlets back again.
Late in the season, when all the fruit and leaves have been removed up as far as the wires, low-trajectory sprinklers can replace all the other watering methods. This mobilises the nutrients through the entire soil mass; evens out the spread of water and nutrients; and drawing the roots to the surface, allows them to ramify everywhere.
TRICKLE FEEDING SOLUTIONS
Experiments have shown that a relatively few formulas cover all the requirements, regardless of the locality or the season. The main differences lie in their strength (‘dilution’) and in the relationship between their potassium and nitrogen.
Magnesium also is supplied through the liquid feeding programmed, but the remaining major elements (calcium and phosphorus) cannot be efficiently supplied through a trickle system. They do not move freely through the soil and must therefore be applied as base dressings, dispersed through the soil by cultivation.
A simple code is used to express the potassium to nitrogen ratio of the various trickle feeds. The solutions can be bought as proprietary mixtures or made up from pure chemicals. The following table indicates the main types, with their constituents, their potassium to nitrogen ratio, and their code name.
|
Material
|
Quantity for 10 liters of water*
|
Approximate potassium to nitrogen ratio
|
Codename
|
| Sulphate of potash |
2kg
|
Potassium only
| K |
| Nitrate of potash |
2kg
|
3:1
| 2KN |
| Nitrate of potash Urea |
2kg
400g |
2:1
| 2KN |
| Nitrate of potash Urea |
1.8kg
1.6kg |
1:1
| KN |
*An average diluter bottle holds 101(about 21 gal).
Magnesium sulphate is usually added to the stock solution at the rate of 50 g/l. In many districts this has been enough to prevent any symptoms of magnesium deficiency in the crop. It is also the maximum amount the standard solutions will absorb without the salts recrystallising when the solution is kept in a cold place, such as an unheated glasshouse. If a higher magnesium content is needed the stock solution must be made weaker. Your local advisory officers will provide guidance on this point.
The chemicals that are used are crystalline (as opposed to pelleted or coated) potassium nitrate (13 percent N and 35 percent K), potassium sulphate (39 percent K), urea (46 percent N), and magnesium sulphate either as Epsom salts (10 to 12 percent MgO) or Kieserite (16 to 17 percent MgO).
Industrial-grade chemicals are preferable as they are easy to dissolve and do not leave any residue. Fertilizer-grade chemicals usually leave some impurities after dissolving. They must be removed by overnight settling or by filtering. Where necessary, a suitable dye (fluorescine, magenta, or disulphine blue) is added to keep a check on bottle contents. A stock solution is made from 6 g of the chosen dye in 1 of water, and 5 ml of this is added to each litre of the fertilizer solution.
TRICKLE FEEDING PROGRAM
Trials have shown that there is no need for any great variation in the chemical content of the trickle feeding solution. The season and the geographical area determine the most commonly required formula. Thus a KN solution is the main feed for all of the warmer areas. For the colder area, the main feed is a 2KN one, with a 3KN feed during adverse weather.
The dilution rate of the stock solution and the amount of trickle irrigation that is required are to some extent related. Together they form the tomato grower’s most difficult problem.
BALL WATERING
To induce proper development of their floral parts and fruit, tomatoes need some curb on their early growth. Their root development must be kept under control. Tomatoes should be planted in a rather dry soil. At first the plants are `ball watered’—only a small quantity (up to 0.25 1) of water per plant is applied, at intervals of from every second day to 1 week, depending on the seasonal conditions. The area of damp soil around each plant is very gradually extended and the roots are allowed to grow. The plants should grow slowly, with a relatively `hard’ appearance—especially when planted in autumn, winter, or early spring. Summer-planted crops can often be allowed to grow unrestricted.
At this stage it is important to watch the flowers. They should be well up on the head of the plant, open properly with a good yellow color, and be freely visible. Greenish flowers in tight bunches that do not open properly (`oat flowers’) or flowers hidden in a mass of lush foliage warn of later difficulties.
A glasshouse that has been flooded during crop changeover to wash out surplus fertilizers or in which a test has shown the nutrient levels to be low should be ball watered with a strong trickle solution (1 in 100 or 1 in 150, usually of a 2KN-feed).
MID-SEASON WATERING
When the watering programme or the evaporimeter readings call for more than 0.5 1 of water per application the soil under the nozzle will start to become leached. The roots will soon be drawing all their water from the leached area and ripening disorders will become a danger. From then onwards ordinary water must never be used. Always use a fertilizer solution (except when the water spread is being improved in a soil that is relatively high in soluble salts and pure water is applied after the nozzles have been shifted to their alternative positions).
During the rest of the season correct rates and dilutions are the key to successful tomato growing. Continue with a watering programmed based on a district schedule or on your evaporimeter readings, but corrected frequently after reading the plants and checking with a trowel the water spread in the soil. As the quantity being applied increases, the trickle solution is made weaker. A high concentration of salts in the soil water makes it more difficult for the roots to take it up. It is therefore growth limiting. A straight potassium feed at a 1 :100 dilution is the most growth-limiting feed that can safely be used; experience has shown that higher concentrations sometimes cause root damage. The weakest solution you use, late in the season, should be about 1 :350. After that, change to overall watering with hoses or sprinklers.
If the plant roots have become confined to the area under the trickle nozzles, weak solutions may quickly give rise to ripening disorders and (on lighter soils) even to nutrient deficiencies. There is little danger in prolonging the application of the stronger solutions as long as sufficient of them is being applied to allow some water to run away to drainage. A build up of soluble salts occurs from frequent applications of quantities so small that they wet the soil only to root depth and then evaporate away from the surface, leaving the salts behind. This eventually causes root damage.
Recent investigations* suggest that when it exceeds a certain concentration ammonia in solution becomes toxic to tomatoes. Urea in the soil breaks down to ammonia. High-nitrogen trickle feeds based on urea that are used at high concentrations may cause root damage. The concentrations and formulations that have been suggested in this bulletin are believed to be safe, but should not be exceeded.
*By Dr R. White
WATER STRESS
There are some symptoms of water stress with which you will need to ecome familiar. They are to be found on the plant rather than on the fruit.
They often provide an early warning, before the fruit is damaged.
- Where the flower stem (up to 20 mm long) joins the `truss’ or `bunch’ stem there is a slight localized thickening called the `knuckle’ which provides a good guide to water stress. It should be of the same general color as the surrounding stems. If it is pale green or yellow in color, the plant is suffering from a lack of water which, if not corrected, will soon cause the flower to drop off at the knuckle.
- The shape of the main stem of a growing plant is another good guide. It should be of approximately the same thickness all the way up, but when a plant is under water stress the main stem becomes thin and stringy while over watering causes it to become fat and succulent, until it is full of rather loosely packed `pith’ tissue. When over watering continues until the plant roots are damaged the pith inside the stem collapses, causing `hollow stem’. This is easily felt from the outside. If it occurs the watering programmed needs to be corrected at once.
- Even slight over watering will eventually cause the plant tips to turn pale. They will go gradually from light green to yellow to almost white, although a network of fine veins will remain green. This effect is probably caused by poor root respiration interfering with the uptake of certain trace elements. It is usually fully reversible.
Ripening Disorders
The quality of glasshouse tomatoes depends mainly on correct watering and feeding and on the absence of `ripening disorders’. Any other factors that influence the quality are usually varietal characteristics.
Soluble Salts
The effects of water stress and of an excess of soluble salts cannot very well be separated. All tomato soils are well supplied with minerals, and any drying out always causes a higher concentration of mineral salts, while watering dilutes them. The effects of drought are, therefore, usually combined with symptoms of an excess of salts. However, extremely high salts levels may affect plants even though the soil is quite moist.
High salts produce slow growth, wiry stems, and short internodes. The foliage is a shiny blue-green and the leaves are hard to remove. The flowers are small and bright yellow to almost orange. The fruit is small, very dark green (especially on top), and ripens through a mahogany color to an eventual bright red.
Low salts produce a plant that grows quickly and has a thick, brittle, pale green stem. Its leaves are large and break off easily, or soon fall off. The flowers are large and pale yellow to creamy. The fruit is large and soft. It ripens through whitish green to eventual pink, and usually exhibits disorders of the blotchy ripening type. Affected plants may be found even in apparently dry soils. In wet soils they `guttate’—they produce water droplets on the leaves at night and are wet by morning.
HEATING AND VENTILATING
Temperatures that are too high or too low will adversely affect plant growth and fruit production. Hence these two factors are usually treated under the one heading.
A heating system should be designed to provide an even temperature,
‘ thermostatically controlled, throughout the cropping space. Trials are going on to determine the optimum temperature for satisfactory plant growth, both vegetative and fruiting.
Experiments indicate that from planting to picking the day temperatures in unheated houses should be between 21 ° and 24°C. After picking has begun they should be reduced to between 18° and 21 °C. This should improve the late yields and reduce any humidity problems, but it can only be managed with careful ventilation and (usually) by planting in late summer, late winter, or early spring.
A heated house provides greater temperature control. From planting to picking 18°C at night and 20°C by day are recommended, with ventilation starting at 21 °C. After picking has begun these temperatures can be lowered by about 3°C. An efficient heating system is therefore required and many growers have been dismayed by its cost. However, preliminary trial work has shown that the extra cost of the fuel is more than made up for by bigger yields at a time of higher prices.
In districts with a high relative humidity, an increase of one or two degrees in temperature will lower it and thus reduce the likelihood of disease.
Ventilation is the main temperature and humidity control. In a normal glasshouse there is ample exchange of air. Any urge to open it up early in the morning and close it at twilight should be ignored. When to open or close the ordinary shutter-type ventilators should depend on temperatures. Automatically operated ventilators are slowly growing in popularity. Which of a house’s vents are opened and how widely depend on the direction of the wind and on the inside temperatures.
Every glasshouse must have adequate provision for ventilation. The area of its ridge ventilators should equal at least one-sixth of the floor area. Side vents are desirable; they are much easier to install while the house is being constructed.
CULTIVATING
TRAINING AND PRUNING
Each plant is trained as a single stem, up to a wire. When it is 30 cm high you should remove its two lowest leaves and tie a binder-twine reef knot below the third leaf. Make the loop large enough to allow the stem to swell. Tie the other end of the twine to the overhead wire with a bow knot, leaving a slight sag in the twine between the plant and the wire. As the plant grows, support it by twisting the twine around it.
From 3 weeks after planting remove all the laterals before they reach 10 cm in length. If they grow too big they waste plant energy and the large wounds they leave when they are removed provide an entry for diseases.
When the fruit on the second truss is of marble size, remove all the leaves below the bottom truss. Snap them cleanly off at the main stem. This helps to keep the base of the stem dry and disease free. Laterals snap off more easily when the plants are turgid.
DAMPING DOWN
After planting out, a light overhead damping with water on sunny days will help reduce moisture stress. In warm weather more than one damping per day may be needed. On sunny winter days damping down is sometimes used to avoid watering if bad weather is forecast within the next 36 hours. Such watering may cause the plant to grow too quickly during the bad weather and lead to a deterioration in its fruit quality.
Damp down no later than 2 p.m. in sunny weather and never in bad weather. The leaves must be dry before sunset; diseases attack leaves that are wet at night.
Overhead damping that is sufficiently forceful to shake the flowers also helps the natural setting of the fruit. If pollen drops out (`flies’) from the flower when it is shaken, the weather is warm enough for natural setting and damping down will help. If the pollen does not fly, damping down will not help.
FRUIT-SETTING SPRAYS
Sprays may be used in winter to promote adequate fruit setting and swelling. As they open, the flower trusses are sprayed with a fruit-setting solution that is diluted according to local conditions. The more liquid you apply, the weaker the solution can be.
A fungicide is added to the dilute solution to stop botrytis disease from growing on the dead petals and spreading from them to destroy the young fruit. Check on fungicide materials with your local MAF advisory officer.
A truss is sprayed when there is an open flower on it. Some growers spray weekly, others every 10 days. A very short burst into the flowers may be enough. If the plant head is in the line of fire, use your gloved hand to protect it from the spray—otherwise it may suffer hormone damage.
If a nipple or a spike develops at the blossom end of the fruit (opposite the fruit stalk) your spraying has been too vigorous and prolonged.
The classical symptoms of hormone damage (narrowness and veins that run parallel) may develop in young leaves that get a good dose of fruit-setting spray. This can be confused with hormone-weedkiller damage, but mild and scattered cases at the start of the fruit-set season are probably caused by the fruit-setting spray. They do not affect the fruit crop.
When shaking the flower causes the pollen to fly, the weather is warm enough for natural setting and hormones are not required. In marginal conditions, pollen is most likely to fly between 10 a.m. and 3 p.m., while the house is warmest. Tapping the wires and overhead damping both promote natural setting.
MULCHING
After planting, a 3-cm-thick mulch of untreated sawdust is sometimes spread over the paths. Don’t use black, partly rotted sawdust (it releases ammonia gas which burns the leaves) or treated sawdust (the chemicals in it damage the plants).
The sawdust mulch is pleasant to work on and by reflection increases the light in the glasshouse. It rots slowly during the season and, when the crop comes out, is worked into the ground to add to the organic-matter reserves. It does not upset the soil’s nitrogen balance when it is used in this way.
HARVESTING
There are almost as many ways of picking and packing glasshouse tomatoes as there are growers of them. A great many ways are adaptations to suit a particular set of circumstances. There is therefore no `best’ method, but the following recommendations should ensure the highest possible quality.
PICKING
Tomatoes should be picked as early as possible in the morning. The plants are then well supplied internally with water and the tissues are brittle enough to allow easy picking (even of some new varieties that have rather strong vascular strands). The fruit will also be well supplied with water and at its firmest. It will thus be better able to stand some water loss by transpiration during transit. It should not have been exposed to any sunlight and will still be as cool as (or cooler than) the glasshouse air, allowing it to be graded, packed, and sent away as cool as possible.
PRECOOLING
At sunrise in most glasshouses condensation forms quickly on the fruit. Ventilators should be opened early to prevent this, otherwise the fruit becomes too wet for picking and must be left until late in the morning. By then it will have become quite warm and this heat will have to be removed if any loss of quality is to be avoided.
Precooling is a highly effective way of overcoming this problem, of preparing the fruit for transport, and of ensuring that it arrives in good condition. Quite a small coolroom can cope with the daily output of the average property. The refrigeration plant should be rather powerful, so that it extracts the heat from the fruit quickly. Adequate air movement is also essential and a fan-assisted circulation system must be installed. Adequate air channels must be left between the stacks of fruit. Although precooling should allow you to pick the fruit at any time of day, in practice early-morning picking is still desirable because it is easier and the fruit is firm. To avoid problems with condensation, the fruit should be properly packed and the boxes closed before they are put into the coolroom and stored until they are to be sold.
COOL STORAGE
Tomatoes are also held in cool storage over weekends or when marketing would be inconvenient. According to the `Handbook on the storage of fruits and vegetables’*, mature tomatoes can be cool stored after being harvested while they are green or partially colored. The purpose is to control the rate of ripening. At 10°C the rate of color change and the development of such disorders as uneven coloring, pitting, breakdown, and poor flavors are much reduced. At a temperature of 13°C, recommended for slow ripening, most varieties retain their good condition for 2 to 6 weeks and change color very slowly. At 16°C the rate of color change increases quite sharply; above 21’C the rate of maturation and other changes increases still further. Tomatoes held at 18°C change color rapidly, without excessive softening. Temperatures of 21°C or above induce rapid ripening and loss of quality. Fully ripe tomatoes can be stored for a short while at 10°C. In some experiments they have stored satisfactorily in 0°C but softening occurs at 2°C. Thus, it is usually risky to store ripe tomatoes for more than a few days.
WHEN TO PICK
The time for this is determined largely by marketing conditions. Tomatoes can be picked at any stage from the mature green to the fully ripe—how long they are to be held after picking will decide the issue. The final quality of fruit picked at various stages of ripeness furnishes very little basis for choice—provided it is well grown and handled. Increasing numbers of glasshouse growers aim for heavier pickings during periods of high demand and lighter pickings during market holidays when the demand is low. This is most commonly brought about by heating. The minimum temperature is set at 16°C or higher, which causes accelerated fruit development. (Lowering the temperature to a minimum of 10°C has the opposite effect, but temperatures below this should not be used as they may cause troubles.)
HOW TO PICK
Most tomato varieties are best picked by placing the index finger on the `knuckle’ of the fruit stem, grasping the fruit between the other fingers and the thumb (take care not to dig your nails or fingertips in), and twisting the fruit upwards. A large proportion of the fruit from plants that are well supplied with moisture will retain the calyx when it is picked in this way. In times of high prices, especially in the South Island, the demand is for
*Canadian Department of Agriculture, Research Branch publication No. 1260.
Tomatoes with the calices on. Special emphasis is placed on large, starry, bright green calices. In volume-fill packs this practice often leads to damage from stem punctures that occur both in transit and in the shop. It is arguable whether a grower who produces out-of-season tomatoes in the high-quality grades should not go the whole way and use a tray pack to take maximum advantage of the attractive calices that many of the newer varieties have.
GRADING
The grading equipment should be well padded—fruit should not drop on to any unpadded surface. Tomatoes often carry beads of gum from stem ends and glandular secretions which rub off on the felt linings of graders, grow hard, and damage following fruit as it passes over the grader. Any felt linings should therefore be cleaned frequently. The time and energy this takes should be more than repaid by the usefulness of such a liner, which helps to wipe off any dust and spray deposits.
Grading Standards
In November 1972, the grading of standard red-strain tomatoes. They represent guidelines only and should not be regarded as mandatory:
- Scope—establishes minimum requirements for `first quality’ and `second quality’ tomatoes at the point of first sale.
- Definitions
Clean—free from dirt, dust, insect stains, or other foreign substances and materials.
Colored—the surface of each tomato shows a definite change of color from matured green to red. Condition
Cloud (blotchy ripening)—patches of tissue of no definite pattern which fail to ripen normally.
Greening—a hard green area surrounding the stalk.
Hard core—a hard or solid area surrounding the core. Matured—fully developed, or having a degree of ripeness that will ensure the completion of the ripening process after harvesting.
Matured green—the surface is still green, the contents of the seed cavities have developed a jellied consistency, and the seeds are fully developed.
Red—the surface is colored uniformly red.
Damage—any defect or injury which materially affects the appearance or storage quality.
Serious damage—surface blemishes of an aggregate area exceeding 15 percent of the aggregate surface area of the tomatoes in the lot, or any deformities as serious as to cause a loss of over 20 percent of the lot in the ordinary process of preparation for use.
Disease—any unhealthy condition caused by any fungus, bacterium, virus, pest, or other cause, and including any fungus, bacterium, virus, or pest.
Smooth—round types are not noticeably ridged, indented, or other-wise misshapen; other types are not, for the variety, excessively ridged, indented, or otherwise misshapen.
Similar varietal characteristics—the tomatoes in any one lot are of the same type and color.
Diameter—the greatest width, measured in a line at right angles to the longest section.
3. Sizes—there shall be four sizes only:
(a)large—exceeding 65 mm in diameter,
(b) Medium—not larger than 65 mm in diameter nor smaller than 45 mm in diameter,
(c) small—not larger than 45 mm in diameter nor smaller than 25 mm in diameter, and
(d)smallest (cocktail)—under 25 mm in diameter.
4. Grades
First quality tomatoes—shall be clean; of similar varietal characteristics; mature, but not over-ripe or soft; well formed, according to variety; and smooth and free from diseases, damage, and decay. They shall also be free from greening, hard core, and growth cracks. They may be red, colored, or matured green.
Second quality tomatoes—shall be of similar varietal characteristics, mature, and moderately well formed. They shall be clean and free from decay and disease, cuts, sun scald, and any serious damage. They shall be reasonably free from greening, hard core, and cloud.
Tolerance—in each container not more than 5 percent shall be below the requirements specified for the particular grade.
5. Unclassified—tomatoes which have not been classified: The term `unclassified’ is not a grade, but is a designation to show that no grade has been applied to the lot.
6. Labelling—cases containing tomatoes should be labelled and all labels should provide windows to allow for separate recording of grade, size, colour, and market line number.
END-OF-SEASON HYGIENE
The following program has been adopted by the Horticultural Research Centre:
- Keep the crop green by watering it until it is ready to pull out. Dead, dry, crumbly leaves are much more difficult to collect and remove than are green leaves.
- Cut stems and strings about 30 cm above ground level. (The stems serve as a handle later on, when you are forking out the roots.)
- Remove the tops. Make a good, clean job of cutting through both tops and strings, so that the wires are left clean and free of debris. Disposing
of the tops is a problem—they are probably best carted off to the nearest public tip. - Sweep the glasshouse floor with a yard broom. Gather up all the brokenleaves and rubbish. This should be fairly easy as the soil is not disturbed until the roots are pulled out.
- Wash down the inside and floor of the house with 1:50 formalin solution. A bucket diluter and high-pressure hose make this job easy.The formalin will kill most pests and disease organisms. Close up the house afterwards and leave it overnight.
- Fork out the tomato roots, getting as much of them out of the ground as possible.
This program was designed to reduce the risk of pests and diseases being carried over from one crop to the next. By the end of a season tomato mosaic virus is usually infecting all the tomatoes in glass-houses. It is not controlled by chemical soil-sterilisation–the smaller the quantity of infected residue there is lying around after a crop, the less risk there is of a disease carryover to the next crop. Sweeping up leaf debris and forking out the roots are particularly important steps. Separating the two jobs reduces the risk of infected debris being buried in the soil.
Pests and the spores of such diseases as botrytis and leaf mould on a glasshouse structure and on the surface of its soil are killed by the formalin wash down which precedes the forking out of the roots. These pests or diseases might otherwise be buried in the soil during the removal of the
roots and might be protected from the soil sterilants by inadequate sterilisation.
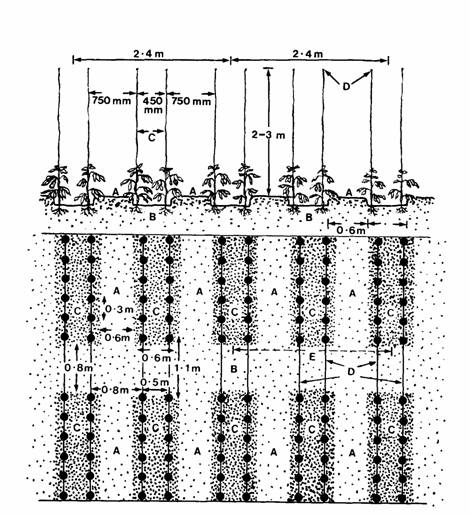
SOIL STERILISATION
Sterilising glasshouse soils to kill or inhibit pathogenic organisms is an essential step in successful tomato growing. For the first one or two seasons you may achieve success without sterilisation, but inevitably fungous diseases and probably such pests as eelworm will establish them-selves. Unless they are checked they will continue to develop until crop yields are reduced. Some will cause the death of plants at any stage of their growth.
Heat is undoubtedly the most efficient means of sterilising soil. In tomato glasshouses it is usually applied as steam. Unfortunately this requires a special steam generator which, with its ancillary equipment, is expensive. The usefulness of steam lies in the fact that it will control all the pests and diseases and most of the weed seeds in an area that is efficiently treated.
There are various means of getting the steam into the soil—grids, steam ploughs, and the `Hoddeson pipe system’ are the main ones. Whatever the system, it should destroy any pathogenic organisms while damaging as little as possible those that are beneficial. At 82°C most pathogens are destroyed but some (notably tobacco mosaic virus) are resistant. Where this is a problem the soil temperature should be raised to as near 100°C as possible. The chart below shows the thermal death point of various organisms.
Several chemicals can be used to sterilise soil. Formalin is an excellent fungicide but does not control eelworm, viruses, or weed seeds. Also it is messy to apply and requires a considerable volume of water if it is to penetrate the soil.
Chloropicrin is the most commonly used material. It gives good control of most pathogens, but does not readily penetrate undecomposed plant material. For this reason, it is not satisfactory on its own where eelworm has been a problem. Also, it has no effect on virus diseases.
DD gives adequate control of eelworm and is frequently used with chloropicrin to control most soil-borne pathogens. Methyl bromide gives excellent control of weed seeds and of eelworm but indifferent control of fungous diseases. Granular chemicals are available and have proved effective, provided they are used strictly according to the directions.
Dosage rates and methods of application vary with the chemical. Your nearest horticultural advisory officer will advise you as to the most suitable material and how to apply it. There are however a few basic points to observe for any treatment to be effective :
- The soil must be well cultivated before being treated, and all possible plant debris from previous crops must be removed.
- The soil should be moist enough and fine enough to hold together when it is compressed in the hand.
- The soil temperature should be at least 14°C and preferably higher when a chemical is being used.
- Allow adequate time after the treatment for the chemicals to disperse ; 3 to 4 weeks in most cases.
- After the soil has been treated do not cultivate it below the depth to which it was sterilised.
- Be careful not to reinfect any soil that has been treated.

- What is an Heirloom Tomato?
- Tomato terminology
- Growing Tomato Seed
- Growing Tomato Plants
- Growing Tomato Seed Problems
- Trellising your tomato plants
- Watering and plant fertilization
- Soil amendments
- Plant disease and pest management
- Harvesting your tomatoes

